
- Fundamentals of Tomato Grafting | Johnny's Educational Webinar Resources
- Webinar Slide Deck | Fundamentals of Cucumber Grafting | 25-pp PDF
- Webinar Slide Deck | Fundamentals of Tomato Grafting | 15-pp PDF
- Video: Tomato Top-Grafting Demo: Splice Grafting & Cleft Grafting • Materials & Technique
- Video: An Intro to the Fundamentals of Tomato Grafting Success | Johnny's Webinar Series
- Video: How to Graft Greenhouse Tomatoes
- Top Grafting Starter Kit Instructions | Tech Sheet (PDF)
- Top-Grafting Tomatoes | Advantages, Materials, Technique | Tech Sheet (PDF)
- Side-Grafting Starter Kit Instructions | Tech Sheet (PDF)
- Side-Grafting Tomatoes | Advantages, Materials, Technique | Tech Sheet (PDF)
- Grafted Tomato Plants | Key Growing Information
- Miter-Cut Grafting Knife (7172) | Johnny's Selected Seeds' Coloring Book
- Humidity Domes | Comparison Chart (PDF)
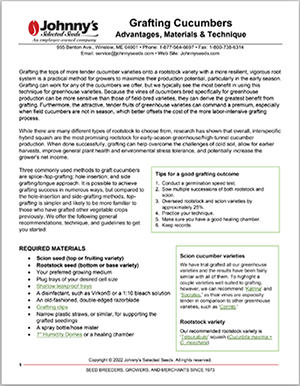
- Cucumber Grafting | Advantages, Materials & Technique
- How to Top-Graft Cucumbers | Tech Sheet (PDF)
- Video: Top-Grafting Cucumbers Demonstration | Johnny's Selected Seeds
- Video: Fundamentals of Cucumber Grafting | Johnny's Webinar Series
- Fundamentals of Cucumber Grafting | Johnny's Educational Webinar Resources
- 'Maxifort' Rootstock Tomato Germination | Tech Sheet (PDF)
Cucumber Grafting • Advantages • Materials • Technique
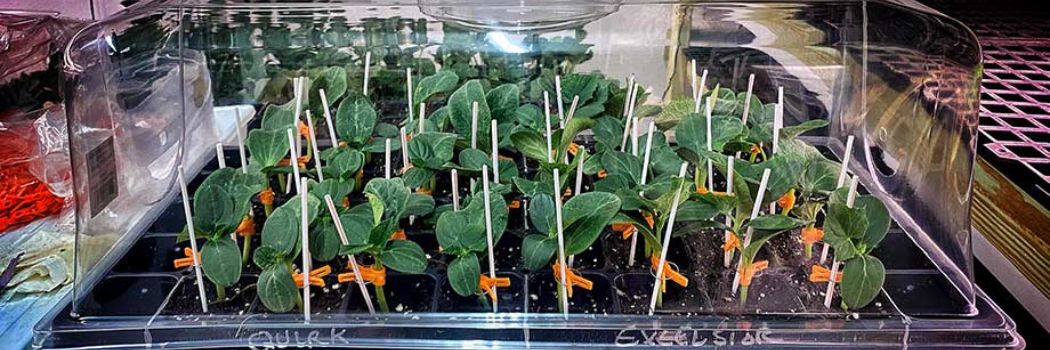
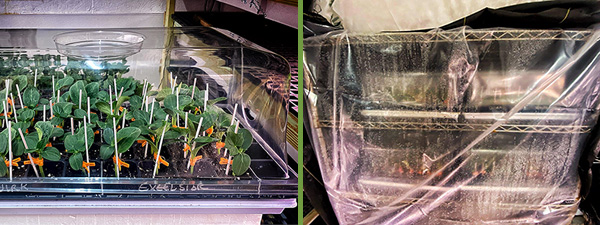
Above: 'Quirk' (L) & 'Excelsior' (R) cucumber scions, splice/top-grafted onto 'Tetsukabuto' squash rootstock, healing within a humidity dome.
by Nate Gorlin–Crenshaw, Trial Technician, Johnny's Selected Seeds
Introduction to Cucumber Grafting
ON THIS PAGE
Grafting the tops of more tender cucumber varieties onto a rootstock variety with a more resilient, vigorous root system is a practical method for growers to maximize their production potential, particularly in the early season. Grafting can work for any of the cucumbers we offer, but we typically see the most benefit in using this technique for greenhouse varieties. Because the vines of cucumbers bred specifically for greenhouse production can be more sensitive than those of field-bred varieties, they can derive the greatest benefit from grafting. Furthermore, the attractive, tender fruits of greenhouse varieties can command a premium, especially when field cucumbers are not in season, which better offsets the cost of the more labor-intensive grafting process.
While there are many different types of rootstock to choose from, research has shown that overall, interspecific hybrid squash are the most promising rootstock for early-season greenhouse/high-tunnel cucumber production. When done successfully, grafting can help overcome the challenges of cold soil, allow for earlier harvests, improve general plant health and environmental stress tolerance, and potentially increase the grower's net income.
Tips for a good grafting outcome
- Conduct a germination speed test.
- Sow multiple successions of both rootstock and scion.
- Overseed rootstock and scion varieties by approximately 25%.
- Practice your technique.
- Make sure you have a good healing chamber.
- Keep records.
Three commonly used methods to graft cucumbers are:
- splice-/top-grafting
- hole insertion
- side grafting/tongue approach
It is possible to achieve grafting success in numerous ways, but compared to the hole-insertion and side-grafting methods, top-grafting is simpler and likely to be more familiar to those who have grafted other vegetable crops previously. We offer the following general recommendations, technique, and guidelines to get you started.
Required Materials
Scion cucumber varieties
We have trial-grafted all our greenhouse varieties and the results have been fairly similar with all of them. To highlight a couple varieties well-suited to grafting, however, we can recommend 'Katrina' and 'Socrates', as their vines are especially tender in comparison to other greenhouse varieties, such as 'Corinto'.
Rootstock variety
Our recommended rootstock variety is 'Tetsukabuto' squash (Cucurbita maxima × C. moschata).
- Scion seed (top or fruiting variety)
- Rootstock seed (bottom or base variety)
- Your preferred growing medium
- Plug trays of your desired cell size
- Shallow leakproof trays
- A disinfectant, such as Virkon® or a 1:10 bleach solution
- An old-fashioned, double-edged razorblade
- Grafting clips
- Narrow plastic straws, or similar, for supporting the grafted seedling
- A spray bottle or hose mister
- 7" Humidity domes or a healing chamber
The stem diameters of cucumbers and cucurbit rootstock are much larger than those of tomatoes and other commonly grafted vegetables. Larger grafting clips, with openings 3.0 mm in diameter or greater, are therefore required with cucumbers. We find that Spring-Loaded Side-Grafting Clips work well for both top-grafting and side-grafting methods.
Seeding Your Cucumber Scion & Rootstock
Germination speed test
Prior to sowing your entire seed batch for grafting, sow 10 seeds of each variety you intend to graft, and note the speed of germination and growth of the rootstocks compared to the scions.
You may also want to take note of light, day-night temperatures, relative humidity, and ventilation variables for your growing conditions, in case they require adjustment or replication.
When it comes time to sow the main batch, you can then time your seedings so that the rootstock and scion have as small a difference in hypocotyl diameter as possible when both are just putting out their first true leaves.
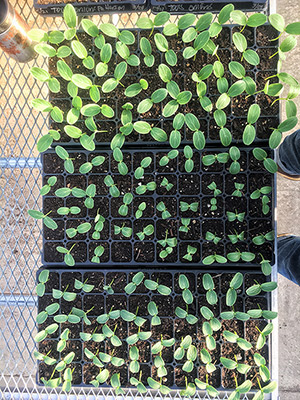
Three different cucumber varieties, seeded at the same time, germinate and grow at different speeds.
Sow seed for your chosen varieties about 4–5 weeks before your desired transplant date, depending on the temperature and amount of light in your growing and healing areas. The healing process adds 1–2 weeks to the seedling propagation phase, compared to non-grafted cucumbers.
While cucumber grafting is more forgiving of differing stem diameters than other crops like tomatoes, it is still ideal for the stem diameters of the rootstock and scion seedlings to be as closely matched as possible, to achieve a strongly healed union. That being said, there is enough of a physical difference in the size of cucumber and squash hypocotyls that exact matching is essentially impossible. While you don't need a perfect match, the closer the two stems are to the same diameter, the better your chance of success.
In Johnny's cucumber grafting trials, we use 'Tetsukabuto' as our cucumber rootstock, a cross of two different squash species, Cucurbita maxima and C. moschata. This wide cross naturally increases hybrid vigor and provides benefits over a cucumber's root system, but also germinates and grows at a different rate than cucumber seed. Such marked differences in germination and growth rates between rootstock and scion varieties make it especially important to practice finding the correct timing between sowing the two. Sowing multiple successions of both rootstock and scion as well as overseeding by about 25% the number of plants you plan to transplant will give you higher chances of success with proper matching and hitting your targeted final plant number. A germination test is another important step in determining the most appropriate sowing times for each variety. (See box.)
Proper germination conditions (85–95°F/29–35°C; high relative humidity; and dark location) can go a long way toward optimizing germination rate and uniformity of both rootstocks and scions. Using a germination chamber, soil probes, moderate moisture, and lukewarm water are additional measures that help. Good germination should occur within 5–7 days. To avoid leggy seedlings, provide adequate lighting shortly after germination, and keep temperature constant (75°F/24°C) for the next 7–10 days. Monitor plant growth rates and slow down varieties growing too fast by reducing water or temperature. Note that temperatures below 55°F/13°C can cause growth to shut down temporarily.
The entire process from sowing of rootstock and scion varieties to final transplanting of grafted plants into greenhouse soil or soilless medium normally takes 4–5 weeks.
Top-grafting Process
Pre-grafting set-up
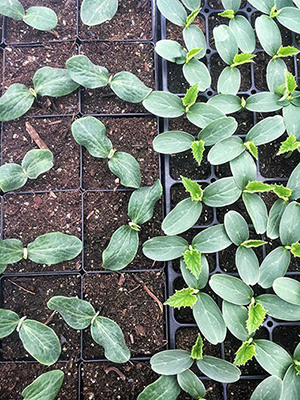
Rootstock (L) and scion (R) seedlings, nearing grafting readiness. The first true leaves of the rootstock plants are just starting to develop; stem diameters are roughly equivalent.
Plants will be ready to graft approximately 5–7 days after the seedling emerges. The ideal time to graft your plants is when the first true leaves on both scion and rootstock have just begun to grow and expand.
- This is the ideal stage for the scion because you have a minimal leaf surface area, which minimizes water loss after grafting, but you also have given the plant enough time to accumulate sufficient carbohydrate to support itself during the graft healing process.
- This is the ideal stage for the squash rootstock because the plant is sufficiently mature to survive the grafting process, the hypocotyl is still roughly the size of the cucumber scion, and if left longer it will begin to develop a hollow stem, which would greatly increase the likelihood of graft failure.
Ideally, you will have staggered the planting of scion and rootstock varieties such that their stem diameters have the smallest possible difference when both seedlings are at this developmental stage.
You will need to prepare a clean area that is out of direct sunlight to do the cutting. An indoor area works well because the climate is more controllable, but an area in a greenhouse that is shaded and not too hot (70–74°F/21–23°C) or dry will work. Do not graft near a fan or draft. The plants will lose moisture less quickly if the grafting is not performed in an overly hot, dry, or breezy location.
Hygiene is very important during grafting because if you pick up a pathogen on your hands or equipment, you could transfer it to all of your plants. Wash your work area down with a disinfectant before grafting. Always start with new or sanitized blades and grafting clips.
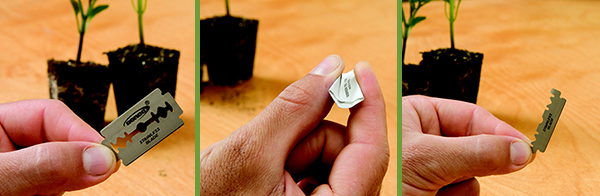
Carefully snap a double-edged razor blade as above, keeping it sheathed in its paper wrapper to avoid cutting yourself.
Take an old-fashioned double-edged razor blade and snap it in half lengthwise while it is still in its paper covering. Take care not to cut yourself; this type of blade is thinner and sharper than other types.
A good healing chamber is one of the most important requirements of vegetable grafting — a space for keeping the newly grafted plants protected and under consistent, ideal conditions until the graft has taken is crucial to success. You will want a setup within which you can control light, temperature, and humidity. You will need to maintain the plants within a humid environment (80–100% relative humidity), out of direct sunlight, and at 77–89°F/25–32°C.
This environment allows for scar tissue to form quickly and keeps respiration rates low until vascular tissues are reconnected. On a small scale, 7.5"-tall humidity domes placed over individual flats work well, but for larger operations, a plastic tent set-up to house a group of plants may be more efficient. Ideally the healing chamber will be positioned near the grafting workbench, allowing the plants to be moved around as little as possible.
Give your plants a deep watering in advance, about 8–12 hours before grafting. If the roots are too wet, the excess moisture will be drawn up the rootstock stem, which can in turn push the scion off, reducing the percentage of successful grafts. Overly wet plants and soil medium are also physically harder to work with, and significantly messier. The plants do need enough water to survive the 5–7-day critical healing process, however, without being watered in the interim.
Practicing
If you have never grafted cucumbers or set up a new healing chamber before, you can start some old cucumber seeds to practice on, and at the same time learn how to best manage your healing chamber.
This also allows you to analyze your technique and make improvements if need be, without as high of a loss or setback.
Alternatively, you can practice by self-grafting some extra scion plants back onto themselves, just to get a feel for the motions, or to demonstrate to new grafters.
Top-grafting
The main challenge of top-grafting cucumbers is to avoid having the newly grafted plants run out of energy before they have finished healing, greatly diminishing the post-graft survival rate. To improve the survival rate, a single cotyledon can be left remaining on the rootstock while its apical meristem tissue and second cotyledon are removed. Leaving the single cotyledon increases the grafted plant's store of carbohydrates, giving it enough stored energy to allow for improved grafting success in a shorter period of time. Because leaving a single cotyledon is a common practice, top-grafting of cucumbers is sometimes referred to as one-cotyledon grafting. For those more accustomed to tomato grafting, leaving one cotyledon on the rootstock will take some getting used to.
Step 1.
Select a plant of your rootstock with a stem diameter that matches that of your scion. Carefully make a cut just between the growing point and one cotyledon: cut down at an angle so that you remove all of the meristematic and true-leaf tissues, plus the second cotyledon, without cutting off the first cotyledon or cutting too deeply into the hypocotyl. (See below.)

Correct placement of grafting cut across rootstock stem, eliminating apical meristem and true-leaf tissues plus second cotyledon, while leaving a single cotyledon.
This is a delicate task that will take some practice before it can be done quickly and successfully. The cut is typically made at an angle between 45–60°, but a good rule of thumb is to try to create a cut surface about ¼" in length. This is a length providing sufficient surface area to reconnect with the rootstock, without being too steep to fit within the grafting clip and without it extending beyond the overlap with the scion.
If the cut is too shallow and not all of the apical meristem is removed, the meristematic tissues will regrow, competing with the grafted scion. If this regrowth happens early on it will often lead to death of the scion, but even if the graft takes and the scion grows normally, residual meristematic tissue can still lead the rootstock to put out vines of its own. If caught quickly, however, rootstock regrowth can often be pinched off with fingers after graft healing and before transplanting.
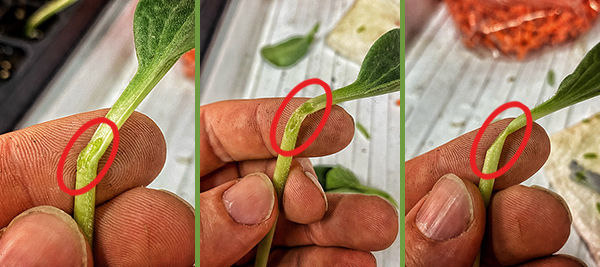
Left: Too shallow, chance of rootstock regrowth. Center: Too deep; cotyledon damaged, hollow stem exposed. Right: Correct angle depth for cut.
Step 2.
Take the scion with a similar stem diameter to the rootstock and sever the scion's top below the cotyledons, at a matching angle to the rootstock. Discard the root ball from the scion. (See below.)
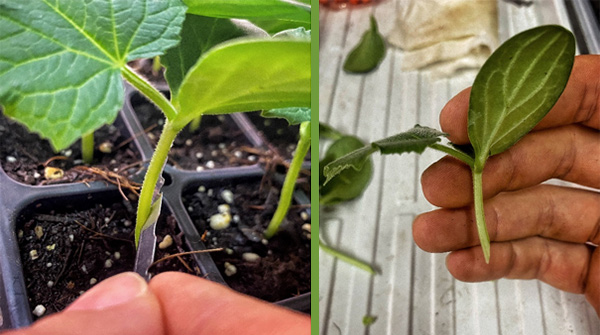
Sever the top of the scion seedling below its cotyledons, at an angle matching the rootstock cut.
Step 3.
Place the base of the cut scion onto the top of the cut rootstock stem so the cuts perfectly match up, ensuring maximum surface area contact between the two plants' tissues. Air or dirt trapped between the cut surfaces will prevent the graft from healing. Gently place a grafting clip around the two components to seal them together, taking care to ensure the scion does not slip out of place. Be sure the grafting clip handle is perpendicular to the stem, so that the scion is held tightly in place. (See below.)
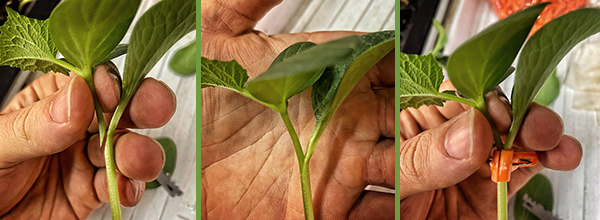
Join the scion and rootstock, then gently secure the union with a grafting clip placed perpendicular to the conjoined stem.
Slide a narrow plastic straw through the ring at the back of the grafting clip and down into the growing media, to provide additional support to the healing plant. (See below.)
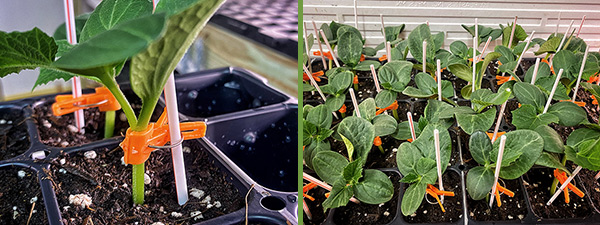
Provide healing plants with support.
Without added support, healing plants may collapse. The cut surfaces of the rootstock and scion plants should be grafted together shortly after the cuts are made.
Healing
As stated above, the healing process is as important as the grafting procedure itself, and critical to grafting success. Newly grafted cucumber plants should be healed in an environment with 100% relative humidity initially, at temperatures between 77–89°F/25–32°C. Temperature inside the healing chamber should be closely monitored to avoid exceeding 95°F/35°C.
Left: Recently grafted plants in a 7" Propagation Dome. Right: Healing chamber with multiple dome-covered trays inside.
The most critical period for graft healing is the first 3–4 days after grafting. For the first 24–48 hours after grafting, maintain 100% relative humidity and nearly complete darkness. It is fairly easy to reach this humidity requirement by gently misting the interior of the healing chamber and the plants with water. The goal is for the plants to rest and avoid photosynthesizing or transpiring while the graft union begins to heal. After this initial rest period, it is important to slowly wean plants back into the light — completely dark conditions delay the graft healing process. Using fluorescent lights with a light intensity of 200–400 μmol/m2/s is sufficient during the graft healing process.
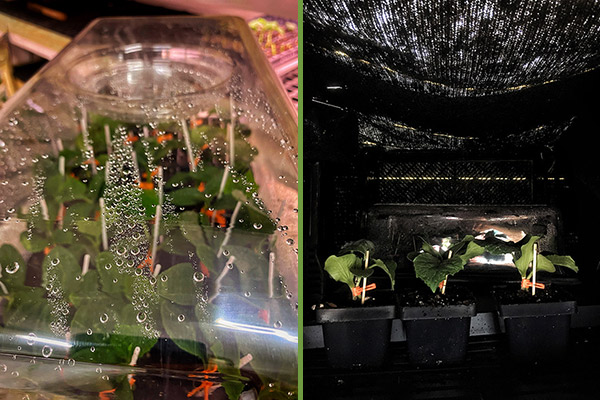
Left: Condensation on the inside of the dome or healing chamber is a good sign that the humidity is high enough to support healing. Right: Temporarily covering the healing chamber with black landscape fabric is an easy way to block out light for the first day or two of healing.
During days 3–7, gradually acclimate the plants back to full light and lower humidity by making small, incremental changes every day or two. There are many ways to accomplish this, depending on your system, but we've provided a flowchart for general guidance (See below). Gradually reduce temperatures and relative humidity over the following days until they reach typical greenhouse conditions. Monitor for wilting, which is a sign that the humidity has fallen too low too quickly, and for stretching, which is a sign that healing has proceeded well enough for the plants to begin growing again and more light would be beneficial.
The entire healing process takes about 6–7 days.
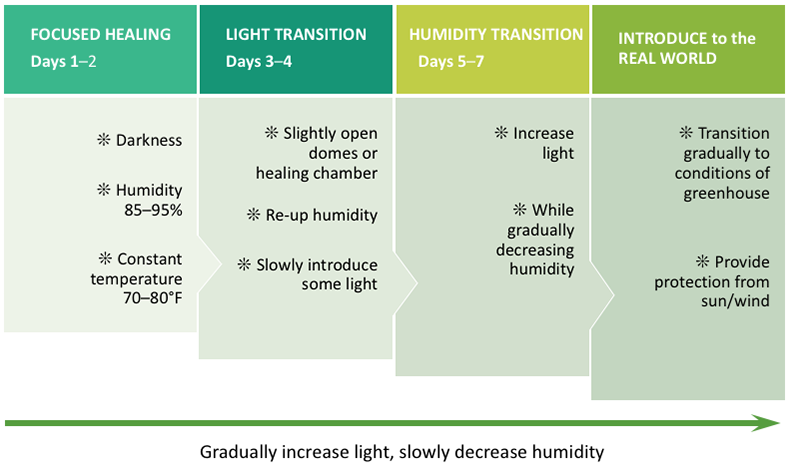
Healing process timeline
If moving the plants from indoors to a greenhouse setting, extra care during acclimation may be necessary to reduce shock; the plants can also be moved out during a stretch of cloudy weather or placed under partial shade. Once the plants have reacclimated to greenhouse conditions for a few days they will be ready for normal handling and watering.
Grafting clips will typically expand with the growth of the plant and eventually fall off by themselves, but they can be collected and disinfected for reuse.
Transplanting
At transplanting, make sure the plant's graft union lies above the soil line, or the scion variety may root into the ground, which would negate some of the grafting benefits. Prune off any suckers that develop at or below the graft union, as these derive from the rootstock and will quickly overwhelm the scion. In addition, consider planting at wider spacing than you might use with nongrafted plants, permitting more leaders to grow per plant, and other modifications in fertility and crop care to maximize the benefits and economics of your grafted cucumbers.
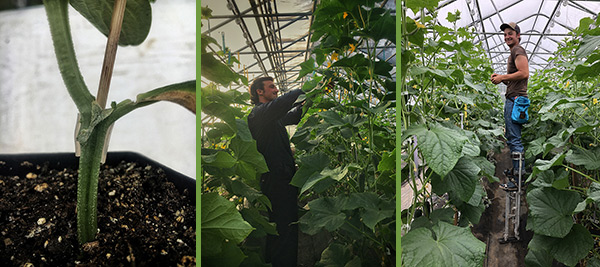
Left: A healed grafting scar on a seedling, positioned well above the soil line. Center & Right: The author tending his greenhouse cucumber trials. Proper pruning and trellising pay off in the form of better plant health, longevity, and productivity.
Given the added time, effort, and expense of grafting, we recommend trellising and pruning the plants using the lower-and-lean production system (or similar), versus the umbrella method, to get the most benefit from your grafted plants. Crop care for grafted plants differs little from that of nongrafted plants, though you may find that the more vigorous vine growth will require more prompt lowering of the plants.
Learn More
Resources from Johnny's
- Printable Tech Sheet (PDF) version of this article…
- For more information on best cultural practices, consult our Greenhouse Cucumber Production • Tech Sheet (PDF)
- Visit our Cucumber Grower's Library…
- Visit our Grafting Library…
- Visit our Pruning & Trellising Library…
- Browse our Greenhouse Cucumber Varieties…
- Browse our Grafting Supplies…