
- Alfalfa & True Clover Inoculant | Label
- How to Make Compost for Your Garden • Tutorial with Niki Jabbour
- How to Make Compost in 4 Easy Steps | Tech Sheet (PDF)
- Exceed Alfalfa/True Clover Inoculant | Information Sheet (PDF)
- Exceed Alfalfa/True Clover Inoculant | OMRI Certificate
- Exceed Garden Combination Inoculant | Information Sheet (PDF)
- Exceed Garden Combination Inoculant | OMRI Certificate
- Exceed Pea, Vetch & Lentil Inoculant | Information Sheet (PDF)
- Exceed Pea, Vetch & Lentil Inoculant | OMRI Certificate
- Exceed Peat Rhizobium Inoculants | SDS (PDF)
- Exceed Soybean Inoculant | Information Sheet (PDF)
- Exceed Soybean Inoculant | OMRI Certificate
- Inoculants | General Information Sheet
- Organilock | OMRI Certificate
- Soybean Inoculant | Label
- Trap Wire Compost Bin & Add-on Bin Assembly | Tech Sheet (PDF)
- Cover Cropping for Field & Garden | Johnny's Educational Webinar Resources
- OK to Compost Certificate | 22mm Compostable Trellis Clips
- Webinar Slide Deck | Soil Health and Management Strategies | PDF
- Video: Soil Health and Management Strategies | Webinar Recording
- Soil Health and Management Strategies | Johnny's Webinar Series
- The Amazing World Beneath Our Feet: An Introduction to Soil Health
- Implementing No-Till Farming Practices
- Cover Crops Information Library | Johnny's Selected Seeds
- Exceed Peanut Cowpea Lespedeza Mung Bean Inoculant | Label
- Exceed Peanut Cowpea Lespedeza Mung Bean Inoculant | OMRI Certificate

Implementing No-Till Farming Practices
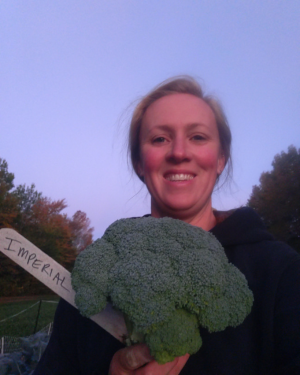
Above: broccoli in a no-till plot at the Johnny's Research Farm
By Jill Porchetta, Farm Technician III, Johnny's Selected Seeds
No till farming aims to increase soil and plant health by minimizing soil disturbance and maximizing soil cover. At the Johnny's Research Farm, where we have 40+ acres of variety trials, seed production, and breeding crops each year, we primarily use a reduced till system that alternates strips of cover crop with strips of cash crop. However, we wanted to trial fully no-till methods. Here we give an overview of how we implemented a no-till Brassica plot on our Research Farm. The no-till methods outlined below are scalable and well-suited for both the commercial grower and home gardener.
Benefits of No Till Systems

The most notable improvement in the no-till plot was the reduced weed pressure.
There are a lot of potential benefits that farmers and gardeners can reap when adopting reduced tillage or no-till practices. Some of the most common benefits include:
- Reduced weed pressure
- Better water infiltration and retention
- Improved plant health due to improved soil health and structure
- Reduced labor inputs
Reduced till or no-till practices aim to create a more holistic approach that mimics nature, and can be integrated into any size farm or garden.
No Till Garden Plot, Step-by-Step
Below is an example of a 30' x 100' no-till plot from our Research Farm during the 2025 growing season and the steps we took to manage it. In this trial, our transplants were planted directly into cover crop residue (plant matter) that had been crimped and tarped. Compared to both traditional methods and our reduced-till methods, this method reduced tractor passes, eliminated the use of plastic mulch, resulted in less weed pressure, and conserved water.
-
Cover Crop Planting
We started by planting a cover crop of 'Spring Green Manure Mix' in early May. The 'Spring Green Manure Mix' contains field peas, oats and vetch which we planted with our no-till drill. No-till drills are an excellent choice for growers with larger plots, however, you can plant cover crops in any size garden. Learn more in our Cover Crop Planting Guide for Home Gardens & Raised Beds.
-
Termination
This cover crop had about two months of growth before we crimped it to terminate it. Crimping involves using a tool with blunt ridges to flatten a crop and crush the vascular tissues, resulting in a terminated crop laid on the soil surface, providing mulch that can be used to protect the soil and prevent weed growth. Crimping is generally most effective during the reproductive phase.
In our trial, we used our tractor mounted roller-crimper, but on a garden scale, you can use the Cover Crop Termination Bar, or a simple homemade crimper using a T-post and some rope.
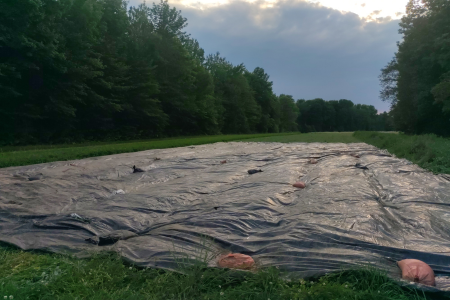
Crimping alone is not enough to terminate this particular cover crop blend, so we then used a silage tarp to smother it. (For more information on terminating cover crops, see our Cover Crop Termination Guide.) The tarp was on for just seven days and that was enough to terminate this cover crop, due to a few days with 90°F temperatures. If you are tarping in the spring when temperatures are cooler, you will likely need to keep the tarp on for longer, maybe 3–4 weeks.
-
Transplanting Your Main Crop
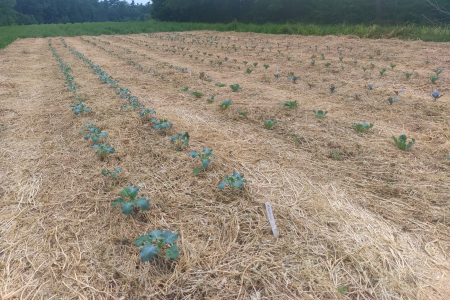
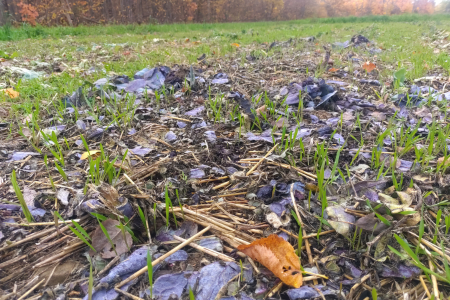
When we removed the tarp, we revealed a beautiful cover crop residue. We transplanted our seedlings into the residue with a water wheel transplanter on July 18th. Depending on how thick your cover crop residue is, a no-till attachment may be needed to transplant. For smaller sized gardens, you can plant by hand with a trowel.
-
Irrigation
You can use any irrigation method in reduced till or no-till plots. Depending on the size of your garden and the crop you are growing, you may use overhead sprinklers, a watering can, a garden hose, or drip tape placed on top of the cover crop residue, secured with staples. In this particular plot, we watered by hand (only 1–2 times per week, despite a severe drought). The cover crop residue was very helpful in promoting water retention in the soil, and we applied much less water than we normally would.
-
Pest Control
In this plot, we chose not to use row cover for pest protection as we normally would because we wanted to see how much we could reduce inputs and still have a successful harvest. There was some initial flea beetle pressure, but it was minimal due to the time of year (late summer). Our primary pests during this trial were cabbage loopers and cabbage worms, which we managed using Dipel®DF. For growers who prefer using cultural practices instead of sprays, using row cover secured with hand pegs is an excellent way to control most pests. Using IPM (integrated pest management) methods, such as planting insectaries and rotating crops is another more holistic approach to managing pests in the garden. Learn more about IPM in our Intro to Farmscaping article.
-
Weed Control
One of the greatest improvements that we experienced in this plot was the reduced weed pressure. Despite the plot being relatively large (30’ x 100’), the only weeding that was required was approximately 15 minutes each week, pulling a few weeds that were emerging. The cover crop residue made an excellent weed suppression mat for a solid seven weeks. We had a flush of weeds germinate on the 8th week; however, our crops were almost finished and ready to harvest by this point.
-
Harvest
In this trial, we determined that yield and performance were in line with what we would expect from the varieties that we used in this plot. We found that we were able to produce very similar results to what we would expect from our reduced-till plantings, with much fewer inputs.
-
Putting the Plot to Bed for Winter
After harvest, it was time to prepare the plot for next year. We used an Ev-n-Spred ® Seeder to broadcast Winter Rye into our plot and on top of the harvested crop. We then used a flail mower to finely chop our plants to expedite the decomposition process. Broadcasting before mowing can help more evenly distribute your seed among the crop residue to improve germination. For smaller plots, you can use loppers to cut the plants at their base, leaving the roots to hold the soil in place and house soil life. Place plant debris in your compost bin.

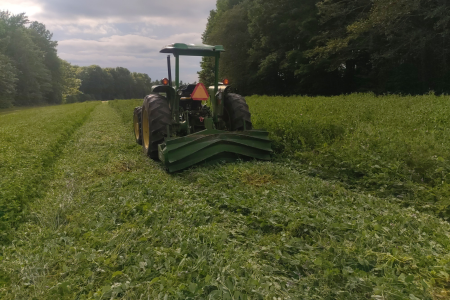
Crimping the cover crop with a tractor mounted roller-crimper. At a smaller scale, gardeners can use a Cover Crop Termination Bar or a simple homemade crimper using a T-post and some rope.

Seedlings planted into the cover crop residue.
You can use any irrigation method in no-till plots. We watered by hand (only 1–2 times per week, despite a severe drought).
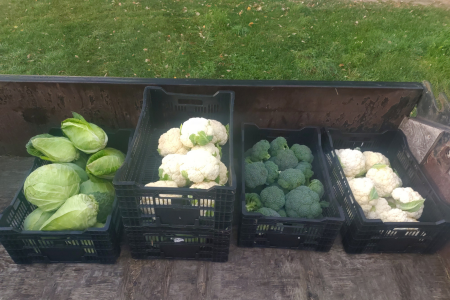
Yield and performance were in line with expectations; we were able to produce very similar results to what we would expect from our reduced-till plantings.
Observations
Overall, the biggest improvement that we observed in this plot was the reduced weed pressure, which was very exciting for us on the Farm Crew! The residue also helped us conserve water, which was invaluable with the exceptionally dry summer we had here in central Maine in 2025.
Tips for Success
There are a few things to be aware of with reduced till and no-till systems. First, there is the potential for increased insect pressure, due to insect habitat provided by the cover crop residue. However, over time, the system will balance itself, and some of these pressures will reduce. Also, the plant debris can be more challenging to plant through, so it is important to consider what tools you have available. It is also critical to consider your planting date in relation to your cover cropping timeline to ensure it is manageable. Lastly, it is worth acknowledging that not all crops work well within this type of system. It is best suited for transplanted and large-seeded crops; some direct seeded crops with small seeds (such as carrots, radishes, or spinach) may be challenging.
More No-Till Planting Examples
Johnny's customer Paul Keller sent us this photo of his no-till cabbage planting. He starts seeds in soil blocks, then plants into a living mulch of clover.
There are many ways that you can utilize no-till practices on your farm, depending on your context. Here are some different examples:
- Transplant an early season crop (such as lettuce or kale) into a winter killed 'Peas and Oats Mix'
- Transplant cucurbits into a crimped Winter Rye residue
- Using a crimped Buckwheat for weed suppression between your cucurbits
- Planting 'New Zealand White Clover' in the foot paths between your beds for a living mulch
You can also use things like straw or leaves to create the same effect and enjoy some of the same benefits as you would with a cover crop residue. There is a lot of potential for growing our food in ways that are more environmentally ethical, and we are very excited about this here at Johnny’s!
Learn More
More Resources
- Benefits of Grass and Legume Combinations • Article
- Buckwheat: A Quick, Easy Summer Insectary & Weed-Control Cover Crop • Article
- Choosing a Spring Cover Crop • Article
- Cover Crop Decision-Making Tool • 5 Steps for Deciding What to Plant When & Where • Article
- Cover Crop Planting For Home Gardens & Raised Beds • Article
- Cover Cropping for Field & Garden • with Collin Thompson, Johnny's Farm Ops Manager • Webinar Resources
- Cover Crop Termination• Article
- Farm Seed & Cover Crops • Comparison Chart (PDF)
- Garden Cover Crops & Green Manures • with Collin Thompson, Johnny's Farm Ops Manager • Webinar Resources
- Intro to Farmscaping: Insectary, Trap, & Repellent Crops for Pest Management • Article
- Intro to Soil Health • Article
- Soil Health and Management Strategies • Webinar
- Winter Cover Cropping: A Fine Time to Build Soil • Article
- Farm Seed & Cover Crops • Comparison Chart (PDF)