
- Guide to Choosing a Garden Seeder
- Direct-Seeding Guidelines | Benefits, Methods & How to Avoid Problems
- Spinach Seed Roller Pack | Tech Sheet (PDF)
- Direct-Seeded Vegetable Crops | Seed Quantity & Average Yield Chart
- Direct-Seeded Vegetable Crops | Seed Quantity & Average Yield Chart (PDF)
- EarthWay Vegetable Seeder | Fertilizer Attachment | Assembly & Instructions | Tech Sheet (PDF)
- EarthWay Vegetable Seeder | Assembly & Operating Instructions | Tech Sheet (PDF)
- Video: Using the EarthWay Vegetable Seeder
- Ev-N-Spred Broadcast Seeder-Spreader | Instructions & Features | Tech Sheet (PDF)
- Ev-N-Spred Broadcast Seeder-Spreader | Lever Settings | Tech Sheet (PDF)
- Four-Row Pinpoint Seeder | Replacement Parts List (PDF)
- Four-Row Pinpoint Seeder | Assembly & Instruction Manual (PDF)
- One-Row Pinpoint Seeder | Assembly & Instruction Manual (PDF)
- Jang JP Roller Trial | FARM SEED Cross-Reference Chart (XLSX)
- Jang JP Roller Trial | CUT-FLOWER Variety Cross-Reference Chart (XLSX)
- Jang JP Roller Trial | HERB Variety Cross-Reference Chart (XLSX)
- Jang JP Roller Trial | SUNFLOWER VARIETIES Cross-Reference Chart (XLSX)
- Jang JP Roller Trial | VEGETABLE Variety Cross-Reference Chart (XLS)
- Jang JP Series Roller Selection Guide | Tech Sheet (PDF)
- Jang JP Series Seeders | Comparison Chart (PDF)
- Jang JP-1 Push Seeder | Operation Manual (PDF)
- Jang JP Series Seeders | Roller Sizes & Applications | Comparison Chart (PDF)
- Jang TD Series Seeders | Comparison Chart (PDF)
- Jang TD-1 Precision Push Seeder | Operation Manual (PDF)
- Video: Jang JP-1 Seeder | Anatomy & Use
- Video: Jang JP-6W Clean Seeder | A Quick Demo at Farmer Kev's in West Gardiner, Maine
- Video: Brad Waugh & JM Fortier on Improving the Six-Row Seeder
- Replacement Hopper for the Six-Row Seeder | Instructions | Tech Sheet (PDF)
- Six-Row Seeder | Assembly & Instruction Manual (PDF)
- Six-Row Seeder, 2nd Edition | Replacement Parts List & Schematic | PDF
- Video: Johnny's Six-Row Seeder • Second Edition
- Video: Using the Six-Row Seeder
- Video: Using the Four-Row Pinpoint Seeder in a Raised Garden Bed | Quick Demo
- Video: Direct-Seeding Your Garden | Tips & Recommendations with Niki Jabbour
- Video: Using the Easy-Plant Jab-Type Planter
- Using the Four-Row Pinpoint Seeder
- Video: Jang Seeder: How to Maximize Its Potential | Johnny's Webinar Series
- Little Green Seeding Machine | Seeding Rates & Seed Compatibility
- Little Green Seeding Machine | Comparison Chart
- Jang JP Roller | Testing Grid (PDF)
- Seeding Date Calculator | To Target Specific Harvest Dates | Johnny's Selected Seeds
- Jang Seeder: How to Maximize Its Potential | Johnny's Educational Webinar Resources
- Connecta® Row Pro™ Hiller/Furrower | Connecta Tool System
- Webinar Slide Deck | Jang Seeder: How to Maximize Its Potential | 28-pp PDF
Direct-Seeding Guidelines from Johnny's
What Is Direct Seeding, and Which Crops Should Be Direct-Sown?
Direct seeding is the sowing of seeds directly into the garden or field. While some crops are better off when started and grown indoors to seedling size before transplanted outdoors, others should be directly sown in the ground.
- Many crops can be direct-seeded, such as beans, carrots, and root crops. For a full list, see our Chart of Direct-Seeded Vegetable Crops
- Many flowers can also be direct seeded, including sunflowers, zinnias, and cosmos. For more information, see our article Top-10 Flowers for Direct Seeding.
Benefits of Direct Seeding
- Avoids disrupting the root system. Disturbing a plant's root system during transplanting can shock the plant. A plant that experiences transplant shock can take several days to acclimate and resume growing. When directly sown, a crop is in place for its entire lifecycle, from seeding to harvest.
- Avoids plants becoming rootbound. Transplanted crops are typically confined within a container before being placed in the field. If they are not transplanted at their peak due to unfavorable weather or other reasons, they can become rootbound, which makes them more prone to transplant shock.
- More straightforward than indoor seed starting. Direct seeding does not require a heated well-lit space in which to start seedlings, nor seed-starting supplies, labor, time, and additional materials for growing on/bumping up the growing seedlings.

Materials for Direct Seeding
- Bed preparation tools. There are a number of tools useful for preparing beds for direct seeding. The ones you will need depend on the size of your garden or field. (For more details, see below.)
- Soil probe thermometer. To check whether the soil has reached a suitable temperature for germination, place a probe thermometer in the soil. Once the temperature reaches at least the minimum germination temperature shown on our germination guides, it is time to sow.
- Seeds. Decide which varieties you want to plant and order the proper quantity of seeds.
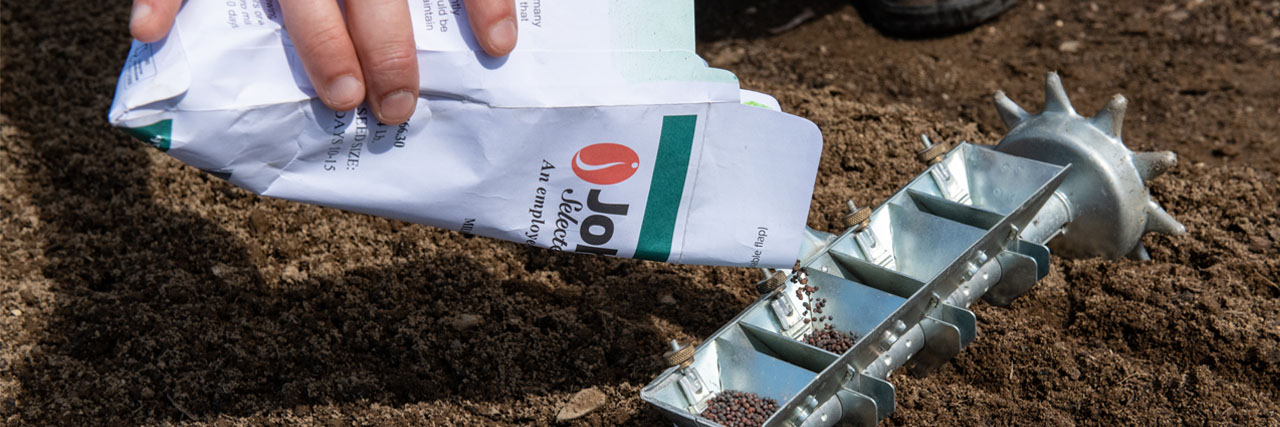
- Seeder. Small sowings can be readily hand sown, but for larger-scale sowings a precision seeder can be indispensable. As with bed preparation tools, there are many types of seeders. The crops you are seeding and how precise you want to be can factor into which seeder you use. Most push-type seeders make use of different plates or rollers to calibrate the device for seeding various different crops. Others are compatible with a smaller range of crops based on seed size. Jab-type planters are used for sowing large seeds. All are equipped with a hopper for holding a quantity of seed. Select a seeder that makes the most sense for your crops and the size of your planting area. (For more details, refer to our Guide to Choosing a Seeder.)
- Labels or stakes. Essential for indicating the start of rows, marking where a different crop begins, the date seeded, and the variety planted in each row or section.
- Watering supplies. These can range from a simple watering can to drip lines, soaker hoses, or overhead irrigation. The size of your planting area, access to a water source, water pressure, and crops planted will dictate which watering method(s) you choose.
- Weeding tools. Proper bed preparation can aid in reducing weed pressure during the growing season, but some hand weeding is almost always required. There are many hand tools, as well as mulches and flame-weeders to increase efficiency. (For more details, refer to our Guide to Small-Scale Weeding & Cultivation Tools.)
- Fertilizer. If needed, soluble fertilizers such as a liquid seaweed or fish fertilizer will provide assimilable nutrients. (Before adding any inputs, however, we advise testing your soil, either by submitting a sample to a soil-testing lab or with your own test kit.)
Bed Preparation for Direct Sowing
A properly prepared bed is important when direct seeding for several reasons. Most seeders perform at their best when the soil is firm and smooth. And whether you use a seeder or hand-sow, a firm, smooth bed favors seed-to-soil contact, which promotes better germination rates, stronger root development, and more vigorous growth.
If learn and grow is what you like to do, you will likely give some thought to how you want to order the process and use the tools you have at hand to develop and refine a process that works well for each area that you plant. But if you are just starting out or just want the basics, here are the steps you can follow to prep your beds for successful direct sowing.
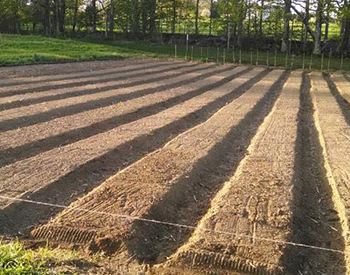
Foreground. A string was run across the front to provide a straight starting edge for the plot.
Background. Stakes were driven along the back of the plot to ensure each bed row lay parallel and evenly spaced to the others.
Background. Stakes were driven along the back of the plot to ensure each bed row lay parallel and evenly spaced to the others.
Beds were formed using an electric tiller, smoothed with a Bed Preparation Rake, and firmed with a Seedbed Roller.
(For more details on tools and methods, see Eliot Coleman's 6-Step Bed Preparation Method or our Guide to Small-Scale Bed Preparation Tools.)

Prepping the test garden at the farm
- Outline The Beds. Outlining the beds prior to preparation ensures the lines run straight and even. When the beds are consistently sized, it allows you to fit more beds into one area. A couple of stakes and enough twine for the length of the bed is a simple way to mark a row.
- If Necessary, Add Amendments. Soil amendments can include composted manure, sphagnum peat moss, lime, greensand, and gypsum, to name just a few. The purpose of amending the soil is to achieve the proper nutrient profile and pH for your crops and also improve the soil structure. Performing a soil test prior to planting can guide you toward which amendments to use.
- Till or Broadfork The Soil. This helps to incorporate any amendments you may have applied. Tilling can also remove or incorporate plant debris from the previous year, destroy weeds, and decrease the number of insects that may have overwintered in the soil. Do not till when the soil is wet, as that may promote compaction and damage soil structure. On a smaller scale, soil aeration can be completed with a broadfork. Electric tools can be helpful for tilling larger areas, and for quite large areas, some prefer a gas-powered tiller or tiller attachment for a compact, garden tractor.
- Level & Smooth The Bed. This is most easily achieved with a Bed Preparation Rake. Leveling and smoothing the bed allows a seeder to move easily without hitting any bumps.
- Firm The Bed. For precision seeders, a firm and smooth bed prevents soil from getting caught in the wheels. The Seedbed Roller, with additional weight placed in the rack on top, can help accomplish this step.
- Remove Weeds. If possible, wait a few days for any weeds to emerge. Use a flame weeder, tarp the area, or manually remove any weeds prior to planting. Then smooth the bed again, if necessary.
Sowing to Thinning Stages
Soil Temperature & Johnny's Germination Guides
Before seeding, ensure that soil temperature and moisture are adequate, to promote consistent and even germination. Seeds planted in soil that is too wet or cool may rot or germinate poorly. Air temperature (ambient temperature) and soil temperature usually differ. For direct sowing, focus on the correct soil temperature.
For most crops, a soil temperature of 55–65°F (13–18°C) is an acceptable range for germination, though some prefer or require cooler or warmer soil temperatures.
Seed packet backs and our Key Growing Information Pages are good places to identify optimum seeding time and soil temperatures.
For vegetable crops, you can also refer to the Germination Guides shown on each vegetable product page and in our catalogs for optimum temperature range. In the example shown here for carrots, germination can take place within the wide range of 41°F to over 95°F, but peaks between 68°F to 86°F, with an optimal temperature of 77°F.
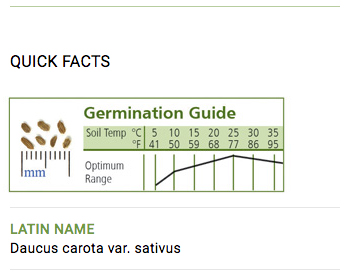
Germination Guide for Carrots
For each of our vegetable crops, we provide a germination guide on the product description webpage showing the crop's optimum germination range.
Check the soil temperature with a soil probe thermometer prior to sowing to avoid poor germination.
Special Seed Treatments Prior to Planting
Certain crops, especially many flowers, need an extra step prior to sowing, to help the seed overcome dormancy barriers. Treatments can include soaking the seed, stratifying the seed, or scarifying the seed. Refer to the seed packet backs or our Key Growing Information Pages for crop-specific information.
In many though not all cases, pelleted seeds are primed during the pelleting process, to increase germination uniformity and break thermal or light dormancy. (To learn more, read About Our Seeds.)
Sowing Seeds
Sow each crop at its appropriate sowing rate, depth, and spacing between rows, as indicated on the seed packet backs or our Key Growing Information Pages. When direct seeding, the sowing rate is typically higher than when seed-starting indoors for transplants. Direct seeding exposes the seeds to the elements, and seeding at the recommended rate can ensure there are enough seedlings for a good stand.
As a rule of thumb on seeding depth, most small-seeded crops can be sown ⅛–¼" deep and larger seeded crops ½–1" deep.
Watering
Once sown, water in the seeds so that there is adequate and even moisture and seed-to-soil contact. Mist or lightly water small seeds to avoid displacing them. Ensure even and consistently moist, but not overly wet conditions until germination. The germinating embryos and small seedlings are delicate and need consistent moisture to fully germinate and complete the earliest life stages; a dry period can kill them. Note that pelleted seeds require more water initially to split or dissolve the pellet and allow for germination.
Post Germination
Watering
Water as necessary to prevent the soil from drying out. This could be as often as once per day or not at all, depending on rainfall, temperature, and sunlight levels.
Weeding
Weed regularly. Weeds compete with crops for nutrients, water, and space. It is critical to keep the crop weeded until the seedlings are large enough to outcompete weeds.
Mulching
Mulching can reduce weed pressure and conserve moisture. Once the seedlings are well-established, a layer of mulch can be added. Mulching materials can include straw, grass clippings, leaves, or many other readily-available materials. Avoid materials (for example hay or uncomposted manure) that harbor weed seed.
Thinning
Thinning is the process of removing excess seedlings in high-density stands once they have developed their first set of true leaves. This allows the other seedlings room to grow and access to nutrients. Thin the crop to the correct stand by cutting or pinching out the stem to prevent disturbing the root system of the remaining seedlings. Thinnings can be left in the soil or composted.
Fertilizing
If needed, apply a soluble fertilizer about 4 weeks post-germination. Follow the instructions on the label. Fertilize about once per week. If the crop looks green and healthy, there is usually little or no need to fertilize.
Problems to Avoid
- Poor germination and thin stands. These can be caused by a number of factors, including the following.
- The soil could have been too cold or damp at time of sowing.
- If a seeder was used for sowing, it may not have been correctly calibrated to the size of the seed, resulting in skipping and/or the seeds being planted too shallow or too deep.
- Insects, birds, or other pests or pathogens could have damaged the planting.
- Too much water could have caused the seed to rot.
- Birds and other animal pests. One of the earliest challenges when direct-seeding crops is to prevent the seeds from being eaten by birds, mice, and other small rodents.
- Shield newly-sown seeds with bird netting or row cover if birds are an issue.
- Repel rodents by applying Plantskydd®.
- Slow maturity. Seedlings started indoors for later transplanting receive ideal conditions during the germination and early-growth stages, leading to faster initial growth. In contrast, the date for direct-seeded crops is limited by acceptable planting temperatures at the beginning of the growing season. Ensure an early planting for long-season crops, or grow transplants.
- Weed competition. Newly-germinated and young seedlings may have trouble competing with weeds, as they won't have extensive root systems to reach nutrients or a large canopy to shade out weeds. Remain attentive to weed pressure to prevent weeds from overtaking the crop.
- Elevated insect pressure. Small direct-sown seedlings are at greater risk of succumbing to insect pressure than transplanted seedlings. Their leaves are more tender and feeding by insects can do a lot more damage to a small plant. Row covers may offer some protection plus additional warmth for direct-sown crops.
Learn More
- Key Growing Information for Vegetables, Fruits, Herbs, Flowers & Farm Seed • Index
- Direct-Seeded Vegetable Crops • Seed Quantities Needed for Sowing & Average Yield per 100' Row/Acre • Chart
- Eliot Coleman's 6-Step Bed Preparation Method • Article
- Guide to Choosing a Small-Scale Seeder • Article
- Guide to Small-Scale Bed Preparation Tools • Article
- Guide to Small-Scale Weeding & Cultivation Tools • Article
- Plant Hardiness Zone Map
- Cooperative Extension Service