
- Seed-Starting Date Calculator: When to Start Seeds Indoors | Johnny's Selected Seeds
- Seed-Starting Date Calculator: When to Start Seeds Indoors | Johnny's Selected Seeds
- Seed-starting Methods at Johnny's Greenhouses | 3 Systems for Starting Professional-Quality Seedlings Indoors
- Guide to Starting Seeds Indoors | Tips & Troubleshooting Advice for Starting Healthy Seedlings
- Transplanted Vegetable Crops | Plant Quantity & Average Yield Chart + Feet of Row per Acre
- Transplanted Vegetable Crop Yield Chart | Number of Plants Yielded per Seed Quantity & Average Harvest Yield
- Johnny's Peat-Free Potting Mix | Label
- Johnny's 512 Mix | Instructions for Using Our Compost-Based Growing Mix
- Soil-Block Makers | Instructions & Blocking Mix Recipe | Tech Sheet (PDF)
- Johnny's Commercial Soil Blocker Conversion Kits | Instruction Manual | Tech Sheet (PDF)
- Johnny's 12-Cell Handheld Soil Blocker | Use & Maintenance | Tech Sheet (PDF)
- Johnny's 10-Cell Handheld Soil Blocker | Use & Maintenance | Tech Sheet (PDF)
- Johnny's 50-Cell Commercial Soil Blocker | Use & Maintenance | Tech Sheet (PDF)
- Johnny's Drop Seeder | Assembly & Use | Tech Sheet (PDF)
- Johnny's 72-Cell Commercial Soil Blocker | Use & Maintenance | Tech Sheet (PDF)
- Discovering Soil-Block Making, by Eliot Coleman
- Video: How to Start Your Seeds with Soil-Block Makers
- Video: About Pelleted Seed
- Guide to Choosing a Grow Light | Tech Sheet (PDF)
- Strip Grow Lights & Accessories | LED & T5HO | Comparison Chart (PDF)
- 4' LED Propagation Rack Kit | Assembly & Use Instructions | Tech Sheet (PDF)
- How to Grow Healthy Plants in Hydroponic Systems | Seed-Starting & Environmental Variables
- Deluxe Microgreens Starter Kit Instructions | Tech Sheet (PDF)
- Deluxe LED Microgreens Starter Kit Instructions | Tech Sheet (PDF)
- Basic Microgreens Starter Kit Instructions | Tech Sheet (PDF)
- Bioset Germinator & Bioset Germinator Kit Instructions | Tech Sheet (PDF)
- Seedling Grower Starter Kit Instructions | Tech Sheet (PDF)
- Manual Leek Planter | Instruction Sheet (PDF)
- Paperpot Drop Seeder Plates | Comparison Chart (PDF)
- Terrateck Paperpot Transplanter | Assembly Instructions | Tech Sheet (PDF)
- Terrateck Paperpot Transplanter | Instructions for Use | Tech Sheet (PDF)
- Paperpot Transplanter | Paper Chain Pots | Comparison Chart (PDF)
- Precision Vacuum Seeder | Instruction Manual (PDF)
- Precision Vacuum Seeder | Interchangeable Plates | Comparison Chart (PDF)
- Precision Vacuum Seeder | Supplemental Instructions | Identifying Your Tray Brand (PDF)
- Precision Vacuum Seeder Trial Results | Plate Recommendations for Flowers & Ornamentals (XLSX)
- Precision Vacuum Seeder Trial Results | Plate Recommendations for Herbs (XLSX)
- Precision Vacuum Seeder Trial Results | Plate Recommendations for Vegetables (XLSX)
- SunBlaster Growlight Garden Instructions (PDF)
- SunBlaster LED Strip Light Operating Manual | English (PDF)
- SunBlaster LED Strip Light Operating Manual | Français (PDF)
- SunBlaster Spectrum Test Report - SBH 4' LED 6400K @ 6" | Tech Sheet (PDF)
- SunBlaster Light Timer Instructions | Tech Sheet (PDF)
- Sunblaster T5HO Comparison to Sunblaster LED Grow Lights | Tech Sheet (PDF)
- Strip Light Stand Instructions | Tech Sheet (PDF)
- Seedling Light Carts | Assembly Instructions (PDF)
- Smart Pots | Comparison Chart (PDF)
- Video: How to Seed Your Paperchain Pots & Trays
- Video: Paperpot Transplanter Demonstration
- Video: Plug Popper | Quick Demo
- Video: How to Use the Precision Vacuum Seeder
- Video: Winter Sowing & Milk-Jug Greenhouses | With Niki Jabbour & Johnny's
- Video: Growing Peppers in Containers with Niki Jabbour & Johnny's
- Video: Direct-Seeding Your Garden | Tips & Recommendations with Niki Jabbour
- Video: Growing Tomatoes in Containers with Niki Jabbour & Johnny's
- Johnny's 32-Cell Handheld Soil Blocker | Manual | Tech Sheet (PDF)
- Connecta® Row Pro™ Hiller/Furrower | Connecta Tool System
- Seed-Starting Flats, Trays, Domes & Pots | Comparison Chart (PDF)
- Flower Seed Starting Fundamentals
- Paper Chain Pots | WSDA Certificate (PDF)
- Flower Seed Starting Fundamentals
- Video: Manual Cell Tray Seeder | from Johnny's Selected Seeds
- Johnny's Paperpot Transplanter | Assembly & Instruction Manual (PDF)
- Soil Blocker ROI Calculator
- RootShield Plus+ WP | Wettable Powder | MSDS
- Johnny's 10-Cell Handheld Soil Blocker
- Connecta® Matrix™ Row Marker | Connecta Tool System
- Seeding Date Calculator | To Target Specific Harvest Dates | Johnny's Selected Seeds
- How to Use the Johnny's 72-Cell Soil Blocker
- Starting Seeds in the Johnny's 12-Cell Handheld Soil Blocker
- Johnny's Infinite Adjustable LED Light Stand | Assembly & Use | Tech Sheet (PDF)
- Johnny's Modular LED Grow Light Cart | Assembly & Instruction Manual (PDF)
- Fertil Pots | OMRI Certificate
- Hardening Off Seedlings With Niki Jabbour
- Bloom to Boom: Flower Farm Profitability
- Johnny's Commercial LED Light Cart | Assembly & Instruction Manual (PDF)
- Johnny's Hand Transplanter | Instruction Manual (PDF)
- Johnny's Hand Transplanter & Caddy
- JSS Commercial 9-Tray LED Light Cart | Instruction Manual (PDF)
- Johnny's Transplant Caddy | Instruction Manual (PDF)
- How to Make Soil Blocks + The Advantages of Soil Blocking With Niki Jabbour
- Johnny's Paperpot Transplanter
- RootShield Plus+ WP | Wettable Powder | Label
- Soil Blocking: A Better Way to Start Seedlings
- Johnny's 72-cell Soil Blocker (Quick Demo)
- Johnny's 12-Cell Handheld Soil Blocker
- RootShield Plus+ WP | Wettable Powder | OMRI Certificate
- Johnny's Infinite Adjustable LED Light Stand
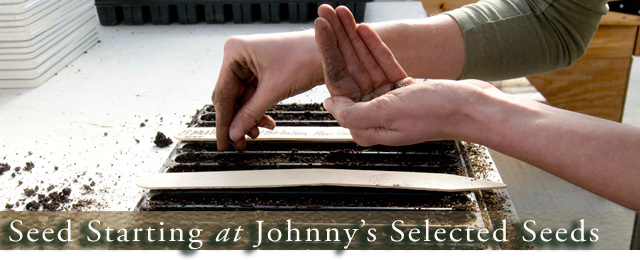
Three Systems for Indoor Seed-Starting
Across the country, growers are firing up their greenhouses, light carts, and germination chambers. It's time to start some seeds!
Here at Johnny's Selected Seeds, we start thousands of transplants for our Breeding and Trials programs. In this article, we'll tell you about the pros and cons of the three main seed-starting systems we use.
Indoor seed-starting techniques vary, depending upon the grower's goals, needs, and experience. Here's an overview of the three systems we offer, and what works best at the current scale of our Research Farm in Albion, Maine, so you can experiment and determine which method is best to start your own professional-quality seedlings.
1 • Conventional Trays & Cell Flats
Molded plastic seedling trays are known as 1020 trays because their dimensions are approximately 10 inches by 20 inches.
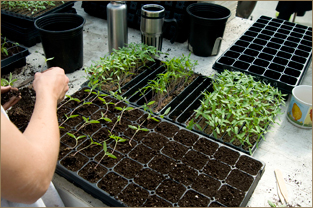
Easy to fill, transport, reuse.
Cell flats (also known as plug flats) fit inside the 1020 seedling trays, leak-proof trays, or lightweight mesh trays, and are available in multiple sizes, identified by the number of cells in each flat.
The most common cell-flat sizes for veggie transplants are 50's, 72's, 128's and 200's. The cells in these flats are square and very closely spaced, to maximize the number of plants you can fit in your greenhouse.
For larger crops, there are cell flats with 38 or 24 cells per flat. The cells are larger, allowing for larger root balls, and the cells are round and spaced farther apart to allow for greater canopy development of the plants.
Another option is the 20-row seed flat, in which seeds are sown in channels to germinate, then "bumped up" or "potted up" into cell flats when their first true leaves appear. Seed flats are advantageous because they conserve seedling heat mat or germination chamber space.
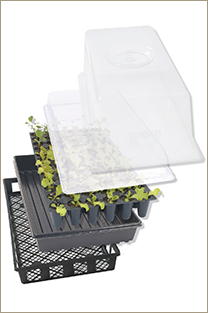
Many growers consider this to be the most efficient way to start large numbers of seedlings at once.
Advantages. Trays and cell flats are the seed-starting method of choice on most large vegetable farms for several reasons:
- They are very quick to fill.
- They can be moved around easily.
- They are appropriate for use with mechanical transplanters.
- They are reusable for many seasons — if handled carefully and stored out of direct sunlight.
Disadvantages. Plastic trays and flats do have some drawbacks.
- They need to be stored and cleaned before they can be reused.
- Seedlings can become root-bound in the plastic cells, and there is some transplant shock when plants are removed from the cells.
- They will eventually wear out and need to be replaced. And when they do, they cannot always be recycled. And when they cannot be recycled, they usually end up in landfills, which has an environmental cost.
For sanitizing trays and as a means of disease prevention in your seed-starting program, we recommend a peroxide-based bleach substitute like OxiDate, which is an OMRI-listed disinfectant approved for use in certified-organic agriculture.
Whether or not plastic items such as trays, flats, and domes are recyclable nowadays is essentially dependent upon their composition, which will determine your local recycling center's policies, capabilities, and partnerships. If you use plastic seed-starting and plant containers, we encourage you to check with your local recycling center for more information on their recyclability.
Because of the scale of our operation, we do primarily use 1020 trays for greenhouse propagation and seed-starting. Here are the basic, crop-specific seed-starting practices with cell flats used here at Johnny's:
- Lettuce is seeded directly into 200-cell flats, two to four seeds per cell. Flats are covered with vented plastic domes, allowing for humidity and temperature adjustment. The domes are removed as soon as the seeds germinate, and plants are thinned with scissors to one seedling per cell.
- Peppers and tomatoes are started in 20-row flats, covered with plastic lids, and set in a germination chamber. As soon as seedlings begin to emerge, the lids are removed and flats remain on the heat mats until all seeds have germinated. When the cotyledons are fully developed, the seedlings are transplanted into 50-cell flats.
- Cucurbits — Cucumbers, melons, pumpkins, squash, and watermelons — are seeded directly into
50-cell flats, with two seeds in each cell. Plants are thinned with scissors to one per cell as soon as possible after full emergence. - Flowers are started in 20-row seedling flats and bumped up into 38-cell flats.
2 • Biodegradable Pots
Very popular, eco-friendly option.
Johnny's sells a type of biodegradable pot known as Fertilpots, which are OMRI-listed and appropriate for certified-organic operations. Fertilpots are individual containers that can be planted along with the seedlings. The pot then breaks down in the soil, allowing roots, water, and nutrients to pass through it.
Advantages. Biodegradable pots eliminate transplant shock and they are super-easy to plant because the plants don't have to be removed from the pot. They also don't leave behind any hard-to-recycle plastic waste. That makes them popular with home gardeners, so commercial transplant growers often use them to give them an edge in plant sales.
Disadvantages. The disadvantages of biodegradable pots include the fact that they need to be replenished each season; they require some kind of carrying tray; and they are not as space-efficient in the greenhouse. As with plastic pots, seedlings can become root-bound if left to grow too long, prior to transplant, in the pots.
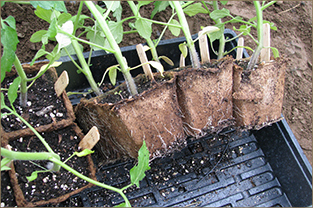
3 • Soil Blocks
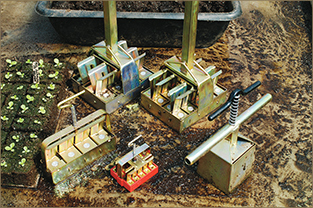
1. Wet soil mix. 2. Push block-maker down. 3. Turn and lift. 4. Set into tray and release… Voilà!
Soil blocks are cubes of potting media that have been created by mechanical forms called Soil-Block Makers. Seedlings grow in a free-standing block of growing medium, rather than in some type of container holding the medium.
Several different sizes accommodate different crops, similar to cell flats. Small, ¾" mini-blocks serve a similar function to 20-row seed flats for germination and potting on to larger blocks. Interchangeable dibbles can be used to make a small round seed hole for smaller seeds, a deep round hole for seeds or cuttings, or a ¾" cubic indentation to accept mini blocks within a larger block.
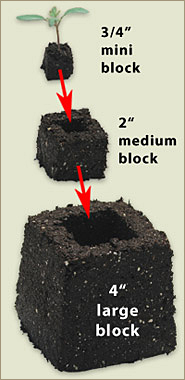
Potting on is the process of starting seeds in small blocks, then transplanting the growing seedlings into successively bigger blocks.
Read more about starting seeds in soil-blocks, by Eliot Coleman…
Read more about starting seeds in soil-blocks, by Eliot Coleman…
Advantages. Soil blocks can produce excellent plants, thanks to the "air pruning" that occurs when the tips of the seedling roots grow to the edges of the block and dehydrate, triggering growth of secondary roots which then spread until they reach the edges. This cycle repeats, resulting in a robust root system spread evenly throughout the entire block, allowing the seeding to establish itself very quickly once transplanted.
Disadvantages. While soil blocks are easy to use and provide reliable results that include faster growth, they are much more labor-intensive to make, compared to the time required to fill flats and pots. This can make them a less cost-effective system for larger growers or anyone shorthanded or pressed for time.
Seed-Starting Supplies & Expertise
That sums up the basic pros, cons, and supplies required for the 3 main indoor seed-starting methods we use at Johnny's Research Farm to support our Breeding and Trialing programs.
Depending upon your own goals and expertise, you may find it most expedient to replicate these simple methods, or modify them to suit your needs, or develop your own seed-starting techniques. Whether you're a budding home gardener or a seasoned grower, Johnny's offers seed-starting supplies and seeds, along with informational support, to serve your seed-starting success.
Learn More
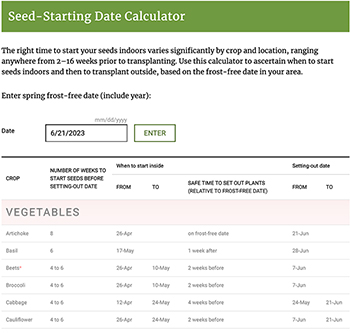
Calculate when to start seeds inside, and when to safely set them out.
Seed-Starting Date Calculator…
Seed-Starting Date Calculator…
The information here applies broadly to most common crops and is intended to help you get your seedlings off to a good start. Giving attention to each crop and variety's more specific requirements, however, will help ensure your crops fare even better. The additional resources listed below offer more detailed information about starting your own plants from seed.
- Key Growing Information for Vegetables, Fruit, Flowers, Herbs, and Farm Seed • Index
- Johnny's Seed-Starting Date Calculator
- Transplanted Vegetable Crops • Plant Quantity & Average Yield Chart + Feet pf Row per Acre • CHARTS
- Guidelines for Starting Seeds Indoors: Tips & Troubleshooting Advice for Starting Healthy Seedlings
- Soil Blocking: A Better Way to Start Seedlings
- Guide to Choosing a Grow Light • Tech Sheet (PDF)
- Potting Mixes for Certified Organic Production • ATTRA Sustainable Agriculture Program (PDF)