
- Seed-Starting Date Calculator: When to Start Seeds Indoors | Johnny's Selected Seeds
- Seed-Starting Date Calculator: When to Start Seeds Indoors | Johnny's Selected Seeds
- Seed-starting Methods at Johnny's Greenhouses | 3 Systems for Starting Professional-Quality Seedlings Indoors
- Guide to Starting Seeds Indoors | Tips & Troubleshooting Advice for Starting Healthy Seedlings
- Transplanted Vegetable Crops | Plant Quantity & Average Yield Chart + Feet of Row per Acre
- Transplanted Vegetable Crop Yield Chart | Number of Plants Yielded per Seed Quantity & Average Harvest Yield
- Johnny's Peat-Free Potting Mix | Label
- Johnny's 512 Mix | Instructions for Using Our Compost-Based Growing Mix
- Soil-Block Makers | Instructions & Blocking Mix Recipe | Tech Sheet (PDF)
- Johnny's Commercial Soil Blocker Conversion Kits | Instruction Manual | Tech Sheet (PDF)
- Johnny's 12-Cell Handheld Soil Blocker | Use & Maintenance | Tech Sheet (PDF)
- Johnny's 10-Cell Handheld Soil Blocker | Use & Maintenance | Tech Sheet (PDF)
- Johnny's 50-Cell Commercial Soil Blocker | Use & Maintenance | Tech Sheet (PDF)
- Johnny's Drop Seeder | Assembly & Use | Tech Sheet (PDF)
- Johnny's 72-Cell Commercial Soil Blocker | Use & Maintenance | Tech Sheet (PDF)
- Discovering Soil-Block Making, by Eliot Coleman
- Video: How to Start Your Seeds with Soil-Block Makers
- Video: About Pelleted Seed
- Guide to Choosing a Grow Light | Tech Sheet (PDF)
- Strip Grow Lights & Accessories | LED & T5HO | Comparison Chart (PDF)
- 4' LED Propagation Rack Kit | Assembly & Use Instructions | Tech Sheet (PDF)
- How to Grow Healthy Plants in Hydroponic Systems | Seed-Starting & Environmental Variables
- Deluxe Microgreens Starter Kit Instructions | Tech Sheet (PDF)
- Deluxe LED Microgreens Starter Kit Instructions | Tech Sheet (PDF)
- Basic Microgreens Starter Kit Instructions | Tech Sheet (PDF)
- Bioset Germinator & Bioset Germinator Kit Instructions | Tech Sheet (PDF)
- Seedling Grower Starter Kit Instructions | Tech Sheet (PDF)
- Manual Leek Planter | Instruction Sheet (PDF)
- Paperpot Drop Seeder Plates | Comparison Chart (PDF)
- Terrateck Paperpot Transplanter | Assembly Instructions | Tech Sheet (PDF)
- Terrateck Paperpot Transplanter | Instructions for Use | Tech Sheet (PDF)
- Paperpot Transplanter | Paper Chain Pots | Comparison Chart (PDF)
- Precision Vacuum Seeder | Instruction Manual (PDF)
- Precision Vacuum Seeder | Interchangeable Plates | Comparison Chart (PDF)
- Precision Vacuum Seeder | Supplemental Instructions | Identifying Your Tray Brand (PDF)
- Precision Vacuum Seeder Trial Results | Plate Recommendations for Flowers & Ornamentals (XLSX)
- Precision Vacuum Seeder Trial Results | Plate Recommendations for Herbs (XLSX)
- Precision Vacuum Seeder Trial Results | Plate Recommendations for Vegetables (XLSX)
- SunBlaster Growlight Garden Instructions (PDF)
- SunBlaster LED Strip Light Operating Manual | English (PDF)
- SunBlaster LED Strip Light Operating Manual | Français (PDF)
- SunBlaster Spectrum Test Report - SBH 4' LED 6400K @ 6" | Tech Sheet (PDF)
- SunBlaster Light Timer Instructions | Tech Sheet (PDF)
- Sunblaster T5HO Comparison to Sunblaster LED Grow Lights | Tech Sheet (PDF)
- Strip Light Stand Instructions | Tech Sheet (PDF)
- Seedling Light Carts | Assembly Instructions (PDF)
- Smart Pots | Comparison Chart (PDF)
- Video: How to Seed Your Paperchain Pots & Trays
- Video: Paperpot Transplanter Demonstration
- Video: Plug Popper | Quick Demo
- Video: How to Use the Precision Vacuum Seeder
- Video: Winter Sowing & Milk-Jug Greenhouses | With Niki Jabbour & Johnny's
- Video: Growing Peppers in Containers with Niki Jabbour & Johnny's
- Video: Direct-Seeding Your Garden | Tips & Recommendations with Niki Jabbour
- Video: Growing Tomatoes in Containers with Niki Jabbour & Johnny's
- Johnny's 32-Cell Handheld Soil Blocker | Manual | Tech Sheet (PDF)
- Connecta® Row Pro™ Hiller/Furrower | Connecta Tool System
- Seed-Starting Flats, Trays, Domes & Pots | Comparison Chart (PDF)
- Flower Seed Starting Fundamentals
- Paper Chain Pots | WSDA Certificate (PDF)
- Flower Seed Starting Fundamentals
- Video: Manual Cell Tray Seeder | from Johnny's Selected Seeds
- Johnny's Paperpot Transplanter | Assembly & Instruction Manual (PDF)
- Soil Blocker ROI Calculator
- RootShield Plus+ WP | Wettable Powder | MSDS
- Johnny's 10-Cell Handheld Soil Blocker
- Connecta® Matrix™ Row Marker | Connecta Tool System
- Seeding Date Calculator | To Target Specific Harvest Dates | Johnny's Selected Seeds
- How to Use the Johnny's 72-Cell Soil Blocker
- Starting Seeds in the Johnny's 12-Cell Handheld Soil Blocker
- Johnny's Infinite Adjustable LED Light Stand | Assembly & Use | Tech Sheet (PDF)
- Johnny's Modular LED Grow Light Cart | Assembly & Instruction Manual (PDF)
- Fertil Pots | OMRI Certificate
- Hardening Off Seedlings With Niki Jabbour
- Bloom to Boom: Flower Farm Profitability
- Johnny's Commercial LED Light Cart | Assembly & Instruction Manual (PDF)
- Johnny's Hand Transplanter | Instruction Manual (PDF)
- Johnny's Hand Transplanter & Caddy
- JSS Commercial 9-Tray LED Light Cart | Instruction Manual (PDF)
- Johnny's Transplant Caddy | Instruction Manual (PDF)
- How to Make Soil Blocks + The Advantages of Soil Blocking With Niki Jabbour
- Johnny's Paperpot Transplanter
- RootShield Plus+ WP | Wettable Powder | Label
- Soil Blocking: A Better Way to Start Seedlings
- Johnny's 72-cell Soil Blocker (Quick Demo)
- Johnny's 12-Cell Handheld Soil Blocker
- RootShield Plus+ WP | Wettable Powder | OMRI Certificate
- Johnny's Infinite Adjustable LED Light Stand
Guidelines for Starting Seeds Indoors:
Tips & Troubleshooting Advice for Starting Healthy Seedlings
Starting your own seeds is a great way to extend the growing season, grow a wider selection of varieties, and save money. Here are some guidelines, tips, and troubleshooting advice for growers who are starting seeds indoors.
Leek seedlings started in flats in our research farm greenhouse
Some crops, such as these germinating leeks, fare best when started indoors and grown into healthy seedlings before being transplanted, rather than being direct-sown in the outdoor garden bed or field. These crops require an up-front time investment to develop to their transplant-ready stage.
Benefits of Starting Plants from Seeds Indoors
- Gives you access to a wider selection of seed varieties:
When purchasing seedlings, you are limited by availability.
- Jump-starts a more productive growing season:
Seedlings a few weeks old can be transplanted outside as soon as soil and air temperatures are warm enough. This enables you to achieve an earlier harvest. Crops with a long maturity period can be started early enough for them to produce a harvestable crop. Crops with a short maturity period can be sown in succession, to keep the harvest coming week after week.
- Gives you greater control over the health of your seedlings:
You can optimize conditions to produce the healthiest possible outcome. Starting your own seeds also decreases the potential risk of introducing pathogens or pests from purchased seedlings.
- Helps you grow the exact number of plants you need:
In comparison, direct seeding can result in spotty germination. Gaps in a direct-seeded stand can occur from variables difficult to control, such as unfavorable temperatures, precipitation, or seed predation by birds, mammals, or insects.
- Reduces weed competition, as well as labor spent on weeding and thinning: Seedlings transplanted to the garden or field compete better with weeds than emergent, direct-sown seedlings.
Crops to Start as Seedlings
Some crops perform best when grown from transplants. These are generally crops that are slow-to-germinate, slow growing, and/or that require protected conditions for best results at the germination and seedling stages.12 Good Seed-Starting Practices
Crop-Specific Requirements
While the seed-starting practices described here apply broadly to most crops, there are often additional, crop-specific requirements that should be observed as well.
Among seed-starting factors that can vary by crop are seeding depth, moisture, temperature, and light requirements. Optimum timing frequently varies by variety as well.
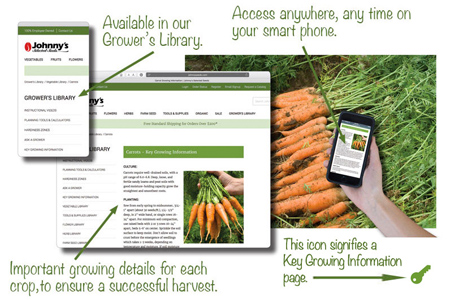
For best results, be sure to refer to the crop-specific Key Growing Information in our Grower's Library, catalog, and seed packet backs.
Among seed-starting factors that can vary by crop are seeding depth, moisture, temperature, and light requirements. Optimum timing frequently varies by variety as well.
For best results, be sure to refer to the crop-specific Key Growing Information in our Grower's Library, catalog, and seed packet backs.
- Practice good sanitation: Clean all work surfaces, planting and watering tools, and any previously used containers such as seedling trays, domes, flats, or pots that you intend to use. Keep planting materials and tools up off the ground, and store in a clean place when not in use. On our research farm, we also add Root Shield to all our trays at tray filling time, as a preventive measure against damping-off, root-rot, and Phytophthora. Read on for more info about damping off.
- Choose a growing medium formulated specifically for starting plants:
An ideal growing medium is one that is highly absorptive yet resists compaction and provides good aeration to plant roots. In contrast, ordinary potting soil or garden soil can be too heavy, and garden soils and reused potting mix can introduce pathogens that can infect seedlings.
Germination and seed-starting mixes are generally made of compost combined with fibrous or porous ingredients that lighten the mix and improve moisture retention and aeration. Typical ingredients include perlite (a volcanic mineral that has been heat-treated; resembles small Styrofoam balls), vermiculite (another naturally occurring mineral that has undergone heat-treatment), peat moss, and/or coir (made from coconut husks).- Germination mix is usually an extra light-weight formulation suitable for small-seeded crops to be bumped-up (see below) at least once before transplanting out.
- Seed-starting mix is usually suitable for larger-seeded crops.
- Use shallow containers or trays: Make sure your seed-starting containers have drainage holes. Avoid deep pots, but for crops that fare poorly if their roots are disturbed (for example, cucurbits), choose a cell or pot size large enough to accommodate the plant until it is time to transplant into the field. As an alternative to plastic trays, try seeding into biodegradable pots or soil blocks. Soil blocks help keep plants from becoming root-bound and reduce the risk of transplant shock.
- Ensure adequate moisture levels for your growing medium before you seed: Add sufficient water to the medium so it holds its shape when squeezed but does not release water. Excess moisture can lead to seeds rotting before germination and dry pockets can interfere with good seed contact when seeding. Whether or not you add moisture and how much you add will vary with the product you are using. For example, we find that we do not need to add moisture to our Johnny's 512 Mix but we do wet down the Fort Light Potting Mix.
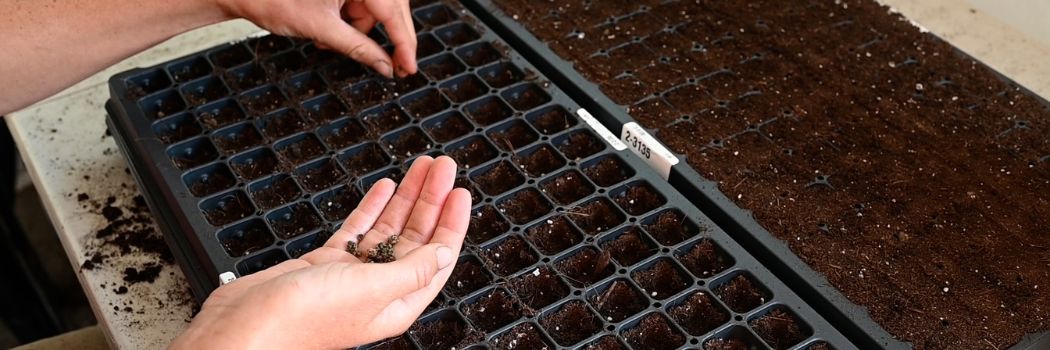
- Place seeds in the medium, carefully following variety-specific instructions for seed spacing: Seeds sown too densely are at higher risk for disease.
- Press seeds firmly into the growing medium and cover: Seed-to-soil contact is critical for germination. Press the seeds firmly into the growing medium and then cover the seeds according to the growing instructions on the seed packet. Follow growing instructions carefully; take care not to plant seeds deeper than recommended, as this can hinder germination. Some crops require light for germination; for these, we always use vermiculite to the cover the seeds, as this allows light to filter in, while still helping to maintain moisture levels. We also use vermiculite for very small seeds unless darkness is required for germination. In both cases, the vermiculite helps to keep the top of the tray from drying out, assisting in maintaining consistent moisture levels for good germination.
- Water-in gently: Take care to avoid washing away the seeds. It is important to keep the seeds consistently moist but not over-saturated during the germination period. Water gently by hand or with an overhead mister. For small seeds, misting is best. Alternatively, you can nest each tray within a leakproof tray and bottom-water. Use plain, tepid water (68°–77°F [20°–25°C]); avoid adding fertilizer prior to seedling emergence, as the salts in the solution can be detrimental to the seeds' ability to take up water and initiate root growth.
- Cover the tray: Use a humidity dome, sheet of transparent plastic or glass, plastic cling wrap, or an inverted tray. This will help to maintain consistent moisture and retain warmth and humidity. Ventilate the cover during sunny, warm conditions; otherwise, the temperature may rise too high and inhibit germination. Remove the cover as soon as the seeds germinate.
- Maintain optimal soil temperature for germination: Check the growing instructions for crop-specific recommendations and adjust temperatures up or down as necessary. Use a heat mat to raise soil temperature if necessary. You can use a soil probe thermometer to monitor temperature. Typically, the temperature recommended for germination is higher than the temperature that newly-germinated seedlings require. Once the seedlings are established, reduce the temperatures as recommended. There may also be recommendations for alternating daytime high temperatures and nighttime low temperatures.
- Fertilize lightly at first, and only as needed: Some growing media contain enough fertility to sustain young seedlings for the first few weeks. Johnny's 512 Mix, for example, contains sufficient fertility to sustain many seedlings to the transplant stage. When using growing media without much nutrition, by contrast, start fertilizing once the plants have emerged and developed their first true leaves. When fertilizing young seedlings, use a dilute nutrient solution according to the directions on the product label.
- Provide supplemental lighting if you are growing indoors: Window light alone is insufficient.
- Bump up according to the specific crop needs:
Also called "potting on" or "potting up," bumping up is the process of moving the seedlings into larger containers prior to being planted in the field. There are several reasons for doing this:
- It provides more room for seedling root development.
- It is an opportunity to provide the seedlings with a more fertile growing medium (larger plants need more nutrients and may have spent available nutrients in the starting mix).
- It's a chance to cull the weaker seedlings.
- It enables you to bury seedlings that have begun to stretch quickly after germination. Tomatoes are an example of a crop that greatly benefit from bumping up; a leggy tomato stem that is buried during the bumping up process will produce root growth, helping to create a sturdier and healthy seedling.
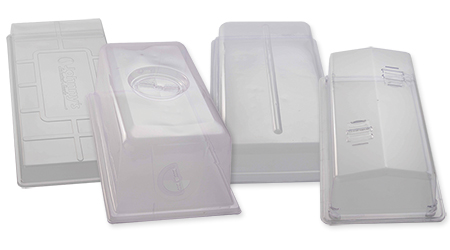
We offer several types of humidity domes for indoor seed-starting and grafting.
A properly fitting humidity dome helps to maintain consistent moisture and temperature, for greater germination success. Remove cover directly following germination.
A widger is a multipurpose stainless steel tool with a convex blade—ideal for gently prying tiny seedlings from their cells, teasing them apart, and dibbling new holes when potting on.
Troubleshooting Poor Germination: Common Problems
Be sure to check the optimal germination temperature for your seeds on the product description page, and adjust the environment accordingly.
If you are having trouble with poor germination, consider the following four factors.
- Check soil temperature:
Soil temperature is critical for good germination, and the ideal temperature range varies for different crops. Some crops, for example, lettuce and spinach, prefer cool temperatures, while others, for example, peppers and tomatoes, prefer warm temperatures.
A soil thermometer is essential for monitoring the temperature of your growing media; without one, you cannot be sure your soil is at optimal temperature for germination.
You may need to adjust your growing environment to achieve the appropriate temperature. For example, you may need to use a heat mat to bottom-warm the growing media to optimal temperature. Or, if the weather is hot and you are starting cold-season crops, you may need to move your trays into the shade or to a cooler location until the seeds germinate. If using a heat mat, note the temperature range of your mat. Some heat only to about 20°F (7°C) higher than ambient temperatures, whereas others are capable of heating up to about 120°F (49°C), even when ambient temperatures are on the low side. - Check moisture levels. Inconsistent or inadequate water is a common reason for poor germination. Water frequently enough to keep the growing media consistently moist, but not oversaturated. Seeds need consistent moisture to germinate, but overwatering can promote rot and mold.
- Check the variety's days-to-germination.
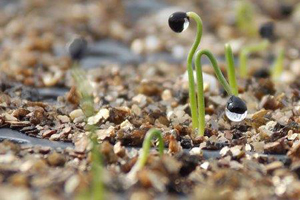
Some crops take a long time to germinate and have uneven germination, meaning some of the seeds will sprout much earlier than others, despite being in the same tray and exposed to the same growing conditions. Other crops emerge quickly and evenly.
Days-to-germination are given in our Key Growing Information for Herbs and for Flowers. Among others, crops that take longer to germinate than most include angelica, asparagus, columbine, and parsley. - Check the crop's lighting requirements for germination. Most crops do not need light for germination, but for some crops—columbine, for example, and both summer savory and winter savory—light is critical for germination. See our tips above for using vermiculate with these crops.
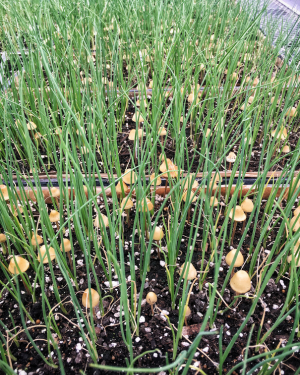
Fungal growth resulting from overwatering.

Normal variability in germination rates: each row in the tray pictured above was seeded on the same day with a different variety of eggplant.
Troubleshooting Poor Seedling Health: 4 Common Problems
- Damping-off:
is a term used to describe sudden death of young seedlings caused by several different fungi and fungal-type organisms, most commonly Rhizoctonia, Fusarium, and Pythium. The pathogen colonizes the roots and/or the stems at, below, or near the soil line, causing decay, a pinched appearance, and collapse, at which point the seedling topples over and dies. Damping off can be particularly problematic in humid conditions, and prevention is key, as treatment options provide limited success at best.
We have already covered (above) some of the seed-starting best practices that help reduce the risk of damping-off:
- Practice good seeding sanitation.
- Use a growing medium designed for starting plants.
- Follow crop-specific instructions for seeding density. Dense plantings can be more susceptible to damping-off.
- Remove tray coverings or humidity domes as soon as seeds have germinated.
- Provide adequate light and fertilizer levels, and maintain temperatures appropriate for the crop.
- Once seeds have germinated, allow the growing medium to become moderately dry between waterings. Oversaturation can lead to disease.
- Provide adequate ventilation and a source of moving air, such as small fans positioned over the seedlings.
- A formulation such as RootShield can be added to the germination mix or watered-in after sowing seeds. This contains beneficial fungi that protect seedlings, so it is a preventive measure, not a cure, that must be used at the time of seed sowing. On our research farm we add Root Shield to all our trays at tray filling time at the rate recommended by the manufacturer.
- Stretching and Legginess:
Once germinated, seedlings need light for healthy growth. A sunny windowsill seldom provides enough direct sunlight to produce strong vegetable, herb, or flower seedlings. Etiolation is the most obvious symptom of light deficiency, characterized by seedlings that develop small leaves, pale coloration due to lack of chlorophyll, and weak, spindly stems as they reach toward the light.
Unless you are starting seedlings outdoors in a greenhouse, you will likely need to provide supplemental lighting in the form of grow lights. Choose a full-spectrum light specifically designed for growing plants. Hang the light just 3–6" from the tops of the plants. Most vegetable, herb, and flower seedlings need 14 hours of light per day.
For more information, see our Guide to Choosing a Grow Light. - Hardening-off and Transplanting Out:
Seedlings need to be gradually acclimated to outdoor conditions before being transplanted, a process referred to as hardening off.
To harden off seedlings, set plants outdoors in a shaded, sheltered location for a few hours during the day and bring them back inside at night. On our research farm, we also reduce watering frequency as part of the hardening off process so that the plants acclimate to field conditions more easily. Gradually introduce the plants to increasing amounts of direct sunlight and outdoor conditions. Harden the plants off in this way over the course of a week, then transplant outdoors on a cool, cloudy day when the weather is settled.
If you do not harden seedlings off, the plants may struggle after being transplanted—suffering from sunburn and windburn. Sunburn appears as white patches on the leaves. Plants will recover from mild sunburn, but the damage can set them back.
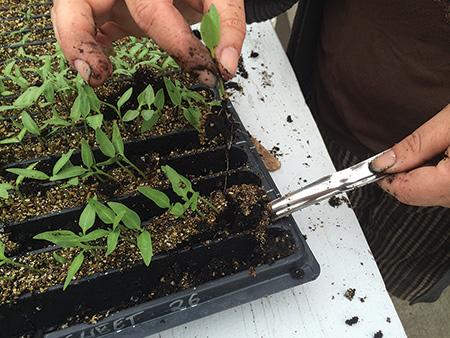
Even when properly hardened off, seedlings are still tender. Avoid transplant shock by handling gently and disturbing the root system as little as possible during transplanting. A plug popper can be used to quickly and gently loosen the seedlings from the flat before transplanting. Water regularly for the first week after the plants have been transplanted, to help ease the transition. - Rootbound Plants: Seedlings can become rootbound if seeded too early and root growth exceeds the available container space. The roots may continue to develop but encircle and overlap themselves in the container, forming a solid rootball mass. It's best to avoid this altogether, but if the seedlings do become rootbound, very gently loosen the tight rootball when transplanting to encourage normal root growth thereafter.
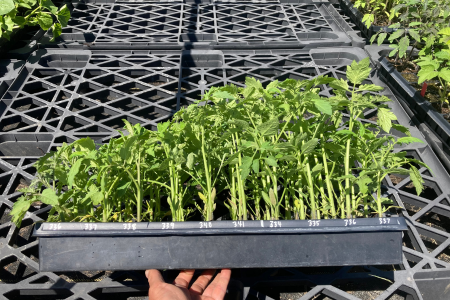
Normal (left) vs. leggy seedlings (right).

Seedlings that are not hardened off properly are more prone to sunburn, windburn, and heat stress.
Learn More About Indoor Seed Starting
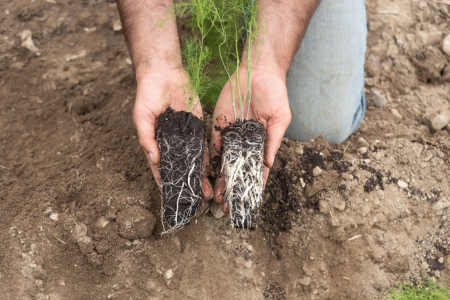
Normal (left) vs. rootbound seedling (right).
The information here applies broadly to most common crops and is intended to help you get your seedlings off to a good start. Giving attention to each crop and variety's more specific requirements, however, will help ensure your crops fare even better. The additional resources listed below offer more detailed information about starting your own plants from seed.
- Key Growing Information for Vegetables, Fruit, Flowers, Herbs & Farm Seed • Index
- Johnny's Seed-Starting Date Calculator • Interactive Calculator
- Transplanted Vegetable Crops • Average Plants per Seed Quantity & Average Yield + Feet of Row per Acre • CHARTS
- Seed Starting at Johnny's Greenhouses: 3 Systems for Indoor Seed Starting • Article
- Soil Blocking: A Better Way to Start Seedlings• Article
- Seed-Starting Flats, Trays, Domes & Pots • Comparison Chart (PDF)
- Guide to Choosing a Grow Light • Tech Sheet (PDF)
- Seedling Light Cart • Comparison Chart (PDF)
- Potting Mixes for Certified Organic Production • ATTRA Sustainable Agriculture Program (PDF)