
- Seed-Starting Date Calculator: When to Start Seeds Indoors | Johnny's Selected Seeds
- Seed-Starting Date Calculator: When to Start Seeds Indoors | Johnny's Selected Seeds
- Seed-starting Methods at Johnny's Greenhouses | 3 Systems for Starting Professional-Quality Seedlings Indoors
- Guide to Starting Seeds Indoors | Tips & Troubleshooting Advice for Starting Healthy Seedlings
- Transplanted Vegetable Crops | Plant Quantity & Average Yield Chart + Feet of Row per Acre
- Transplanted Vegetable Crop Yield Chart | Number of Plants Yielded per Seed Quantity & Average Harvest Yield
- Johnny's Peat-Free Potting Mix | Label
- Johnny's 512 Mix | Instructions for Using Our Compost-Based Growing Mix
- Soil-Block Makers | Instructions & Blocking Mix Recipe | Tech Sheet (PDF)
- Johnny's Commercial Soil Blocker Conversion Kits | Instruction Manual | Tech Sheet (PDF)
- Johnny's 12-Cell Handheld Soil Blocker | Use & Maintenance | Tech Sheet (PDF)
- Johnny's 10-Cell Handheld Soil Blocker | Use & Maintenance | Tech Sheet (PDF)
- Johnny's 50-Cell Commercial Soil Blocker | Use & Maintenance | Tech Sheet (PDF)
- Johnny's Drop Seeder | Assembly & Use | Tech Sheet (PDF)
- Johnny's 72-Cell Commercial Soil Blocker | Use & Maintenance | Tech Sheet (PDF)
- Discovering Soil-Block Making, by Eliot Coleman
- Video: How to Start Your Seeds with Soil-Block Makers
- Video: About Pelleted Seed
- Guide to Choosing a Grow Light | Tech Sheet (PDF)
- Strip Grow Lights & Accessories | LED & T5HO | Comparison Chart (PDF)
- 4' LED Propagation Rack Kit | Assembly & Use Instructions | Tech Sheet (PDF)
- How to Grow Healthy Plants in Hydroponic Systems | Seed-Starting & Environmental Variables
- Deluxe Microgreens Starter Kit Instructions | Tech Sheet (PDF)
- Deluxe LED Microgreens Starter Kit Instructions | Tech Sheet (PDF)
- Basic Microgreens Starter Kit Instructions | Tech Sheet (PDF)
- Bioset Germinator & Bioset Germinator Kit Instructions | Tech Sheet (PDF)
- Seedling Grower Starter Kit Instructions | Tech Sheet (PDF)
- Manual Leek Planter | Instruction Sheet (PDF)
- Paperpot Drop Seeder Plates | Comparison Chart (PDF)
- Terrateck Paperpot Transplanter | Assembly Instructions | Tech Sheet (PDF)
- Terrateck Paperpot Transplanter | Instructions for Use | Tech Sheet (PDF)
- Paperpot Transplanter | Paper Chain Pots | Comparison Chart (PDF)
- Precision Vacuum Seeder | Instruction Manual (PDF)
- Precision Vacuum Seeder | Interchangeable Plates | Comparison Chart (PDF)
- Precision Vacuum Seeder | Supplemental Instructions | Identifying Your Tray Brand (PDF)
- Precision Vacuum Seeder Trial Results | Plate Recommendations for Flowers & Ornamentals (XLSX)
- Precision Vacuum Seeder Trial Results | Plate Recommendations for Herbs (XLSX)
- Precision Vacuum Seeder Trial Results | Plate Recommendations for Vegetables (XLSX)
- SunBlaster Growlight Garden Instructions (PDF)
- SunBlaster LED Strip Light Operating Manual | English (PDF)
- SunBlaster LED Strip Light Operating Manual | Français (PDF)
- SunBlaster Spectrum Test Report - SBH 4' LED 6400K @ 6" | Tech Sheet (PDF)
- SunBlaster Light Timer Instructions | Tech Sheet (PDF)
- Sunblaster T5HO Comparison to Sunblaster LED Grow Lights | Tech Sheet (PDF)
- Strip Light Stand Instructions | Tech Sheet (PDF)
- Seedling Light Carts | Assembly Instructions (PDF)
- Smart Pots | Comparison Chart (PDF)
- Video: How to Seed Your Paperchain Pots & Trays
- Video: Paperpot Transplanter Demonstration
- Video: Plug Popper | Quick Demo
- Video: How to Use the Precision Vacuum Seeder
- Video: Winter Sowing & Milk-Jug Greenhouses | With Niki Jabbour & Johnny's
- Video: Growing Peppers in Containers with Niki Jabbour & Johnny's
- Video: Direct-Seeding Your Garden | Tips & Recommendations with Niki Jabbour
- Video: Growing Tomatoes in Containers with Niki Jabbour & Johnny's
- Johnny's 32-Cell Handheld Soil Blocker | Manual | Tech Sheet (PDF)
- Connecta® Row Pro™ Hiller/Furrower | Connecta Tool System
- Seed-Starting Flats, Trays, Domes & Pots | Comparison Chart (PDF)
- Flower Seed Starting Fundamentals
- Paper Chain Pots | WSDA Certificate (PDF)
- Flower Seed Starting Fundamentals
- Video: Manual Cell Tray Seeder | from Johnny's Selected Seeds
- Johnny's Paperpot Transplanter | Assembly & Instruction Manual (PDF)
- Soil Blocker ROI Calculator
- RootShield Plus+ WP | Wettable Powder | MSDS
- Johnny's 10-Cell Handheld Soil Blocker
- Connecta® Matrix™ Row Marker | Connecta Tool System
- Seeding Date Calculator | To Target Specific Harvest Dates | Johnny's Selected Seeds
- How to Use the Johnny's 72-Cell Soil Blocker
- Starting Seeds in the Johnny's 12-Cell Handheld Soil Blocker
- Johnny's Infinite Adjustable LED Light Stand | Assembly & Use | Tech Sheet (PDF)
- Johnny's Modular LED Grow Light Cart | Assembly & Instruction Manual (PDF)
- Fertil Pots | OMRI Certificate
- Hardening Off Seedlings With Niki Jabbour
- Bloom to Boom: Flower Farm Profitability
- Johnny's Commercial LED Light Cart | Assembly & Instruction Manual (PDF)
- Johnny's Hand Transplanter | Instruction Manual (PDF)
- Johnny's Hand Transplanter & Caddy
- JSS Commercial 9-Tray LED Light Cart | Instruction Manual (PDF)
- Johnny's Transplant Caddy | Instruction Manual (PDF)
- How to Make Soil Blocks + The Advantages of Soil Blocking With Niki Jabbour
- Johnny's Paperpot Transplanter
- RootShield Plus+ WP | Wettable Powder | Label
- Soil Blocking: A Better Way to Start Seedlings
- Johnny's 72-cell Soil Blocker (Quick Demo)
- Johnny's 12-Cell Handheld Soil Blocker
- RootShield Plus+ WP | Wettable Powder | OMRI Certificate
- Johnny's Infinite Adjustable LED Light Stand

Soil Blocking: A Better Way to Start Seedlings
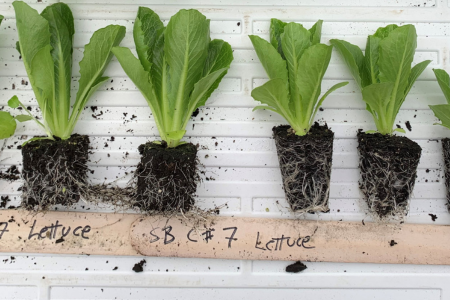
Air-pruned roots (left) vs. rootbound (right).
What is Soil Blocking?
Soil-blocking is an ingenious seed-starting method that uses cubes of compressed soil for starting seeds. Growing seedlings in soil blocks instead of plastic pots or cell trays offers several advantages:
- Increased Seedling Vigor: As seedlings grow in soil blocks, their roots reach the edges of the soil block and are “air pruned.” In other words, when the roots reach the air at the edge of the soil block, the roots stop growing. In contrast, a plant growing in a plastic pot may become “root bound” as its roots encircle the perimeter of the pot. In addition to preventing the plant from becoming root bound, air pruning helps increase the amount of oxygen available to the roots, which in turn can increase seedling vigor.
- Less Transplant Shock: Plants with air-pruned roots quickly re-establish growth upon transplanting and are less prone to transplant shock than plants grown in plastic pots.
- Less Waste: An eco-friendly option for seed starting, soil blocks reduce the waste (not to mention the expense) of plastic pots and cell trays. Plus, you don’t have to worry about how to store a lot of plastic pots.
Choosing A Soil Blocker
There are several different sizes of soil blockers available. What you choose will depend on what you are seeding and the scale at which you are seeding.
The design of Johnny's 12-Cell Handheld Soil Blocker reduces stress on fingers and hands. Watch it in action in our instructional video.
Johnny's Soil Blockers
Unlike other soil blockers, Johnny's-developed soil blockers are designed specifically to fill a 1020 tray fully and evenly without wasted space. They are also designed with improved ergonomics for increased comfort and efficiency.
- Johnny’s 10-Cell Handheld Soil Blocker: two rows of five blocks sized 1 7/8” x 1 3/4” x 2”, with dibbles. This blocker produces 50 cells per 1020 tray (5 compressions of 10). Its design also reduces stress on fingers and hands, making it a more ergonomic handheld option.
- Johnny’s 12-Cell Handheld Soil Blocker: creates twelve 1 1/2” x 1 1/2” x 2” deep cubes, with dibbles. This blocker produces 72 cells per 1020 tray (6 compressions of 12). Like our 10-cell blocker, its design also reduces stress on fingers and hands, making it a more ergonomic handheld option.
- Johnny's 32-Cell Handheld Soil Blocker: creates 32 1" x 1 1⁄8" x 1 1⁄2" cubes with dibbles. This blocker produces 128 cells per 1020 tray (4 compressions of 32). Like our 10 and 12-cell blockers, its design also reduces stress on fingers and hands, making it a more ergonomic handheld option.
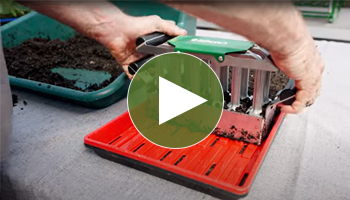
- For the commercial grower, we offer the Johnny’s 72-Cell Commercial Soil Blocker and the Johnny’s 50-Cell Commercial Soil Blocker, both excellent options for operations looking to use soil blocks at a large scale. This soil blocker compresses a full 1020 tray of soil blocks in a single motion.
Additional Soil Blocking Options
We also carry these additional soil blocking models:
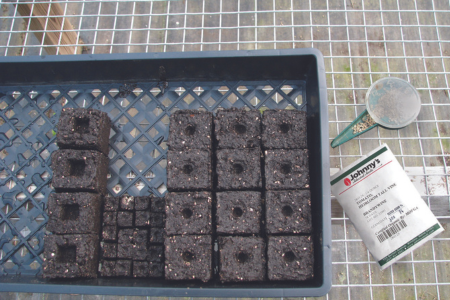
- 20-Cell Handheld Soil Blocker (a.k.a. Mini Soil Blocker): the smallest soil blocker we offer creates twenty ¾” cubes with dibbles. This is a good choice for starting very small seeds and for crops that benefit from bottom heat, as the small size of the cube ensures the seed receives plenty of warmth from the seedling heat mat below. These can be potted up into larger 2” soil blocks when the plants are ready.
- 5-Cell Handheld Soil Blocker: forms five 1 ½” square blocks. These can be used to start a variety of garden seeds.
- 4-Cell Handheld Soil Blocker: creates four 2” cubes of soil. These larger blocks are a good choice for larger seeds or for potting up from mini blocks (from the 20-cell blocker).
- 1-Cell Handheld Soil Blocker: the biggest mold, making 4" cubes, perfect for your biggest seeds, or use it to pot up from the 2” cubes created by the 4-Cell Handheld Soil Blocker. This soil blocker creates a 2” x 2” x 2” dibble/indent for potting-up blocks made with the 4-Cell Handheld Soil Blocker.
- Stand-Up Soil Blockers are an option for any grower who prefers the ergonomics and leverage of a stand-up blocker. We offer 6-Cell, 12-Cell, 20-Cell, and 35-Cell stand-up blockers.
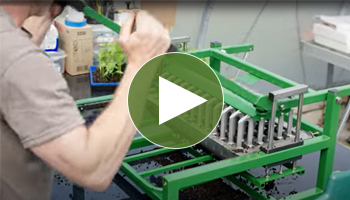
The design of Johnny's 72-Cell Commercial Soil Blocker excels for commercial-scale soil blocking. Watch it in action in our instructional video.
What About Dibbles?
Dibbles make indentations in the soil blocks to assist with seed starting or potting up.
Dibbles (indentations) in soil blocks.
The following soil blockers have built-in dibblers:
- 20-Cell Handheld Soil Blocker (a.k.a. Mini Soil Blocker)
- 1-Cell Handheld Soil Blocker
- Johnny’s 10-Cell Handheld Soil Blocker
- Johnny’s 12-Cell Handheld Soil Blocker
- Johnny's 32-Cell Handheld Soil Blocker
- Johnny’s 50-Cell Commercial Soil Blocker
- Johnny’s 72-Cell Commercial Soil Blocker
We also offer snap-in dibbles. These include:
- Rounded dibbles: snap these dibbles into the soil blocker to create indentations in each soil block for seeding.
- Square dibbles for potting up: use square dibbles to create space in soil blocks for potting up from a smaller size.
Note: Please review the product descriptions to ensure you choose a snap-in dibbler compatible with your soil blocker.
Soil Block Recipe
The key to making good soil blocks is the right growing medium with the correct proportions of peat, compost, soil, and sand or perlite. A blocking mix needs extra fibrous material to bind the material together and help the block retain moisture.
Successful soil-block making also depends on the mix having the right level of moisture. A general rule of thumb is the soil should be moist enough to hold together when squeezed in your hand but there should be no excess water dripping out. Soil that is too dry may not hold together properly. Soil that is too wet may stick to the soil blocker or slide out of the grid.
We recommend the following growing media for soil blocks:
- Johnny’s 512 Mix and Johnny’s Germination Mix: both the Johnny’s 512 Mix and Johnny’s Germination Mix are approved by MOFGA for use on certified-organic farms and are excellent for making professional quality soil blocks right out of the bag. This is what we use on our Research Farm when trialing our soil blockers.
- Eliot Coleman’s DIY Soil Block Recipe: if you would like to make your own soil blocking medium, we recommend Eliot Coleman’s recipe.
DIY Soil Blocking Recipe
From The New Organic Grower, by Eliot Coleman
From The New Organic Grower, by Eliot Coleman
A standard 10-quart bucket is the unit of measurement for the bulk ingredients. A standard 1 cup measure is used for the supplementary ingredients. The following recipe makes approximately 2 bushels of mix.
- 3 buckets brown peat (standard peat moss).
- ½ cup lime. Mix ingredients together thoroughly.
- 2 buckets coarse sand or perlite.
- 3 cups base fertilizer (equal parts blood meal, colloidal phosphate, and greensand). Mix thoroughly.
- 1 bucket garden soil.
- 2 buckets well-decomposed compost. Mix all ingredients thoroughly.
Moisten the mix thoroughly using 1 part tepid water for every 3 parts blocking mix.
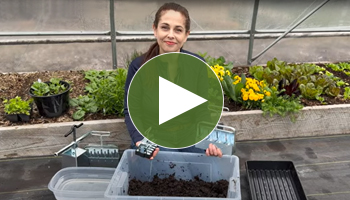
How To Make Soil Blocks, Step-by-Step

Some of our handheld soil blockers and the finished product.
- Blend soil and water to the right consistency (see above).
- Blockers can be used on any flat work surface or our Soil Blocking and Potting Tray. Push the prepared soil mix into a mound that is 1 ¼”–1 ½” deeper than the height of the soil blocker. Push the blocker into the mix until it strikes the work surface. Twist the blocker a quarter-turn to ensure contact between blocker and work surface.
- Scrape any excess soil off the mold. Using our Skimming Trowel can be helpful.
- Set the blocker where you plan to grow your seedlings, such as a wooden or plastic tray.
- Your next step depends upon the model of soil blocker you are using:
- Johnny’s 12-Cell Handheld Blocker: align the plunger with the cells of the blocking grid and lightly compress the soil in the cells. While keeping some pressure on the plunger, gently pull the blocking grid up from the compressed blocks.
- Other Handheld and Standup models: Release the soil blocks onto the tray by pushing down on the handle while raising the blocker.
- Rinse the blocker in warm water to reduce the chance of the next batch of cubes sticking to the blocker.
- Repeat the process.
Full instructions for our handheld and standup models are available here:
- Johnny's Handheld 10-cell Soil Blocker • Instructions • Tech Sheet (PDF)
- Johnny's Handheld 12-cell Soil Blocker • Instructions • Tech Sheet (PDF)
- Johnny's Handheld 32-cell Soil Blocker • Instructions • Tech Sheet (PDF)
- Soil-Block Makers • Instructions • Tech Sheet (PDF)
Note: the process for using Johnny’s Commercial Soil Blockers is somewhat different from the above and is detailed in the Johnny’s 50-Cell Commercial Soil Blocker instruction manual and the Johnny’s 72-Cell Commercial Soil Blocker instruction manual.
Watering Soil Blocks
We recommend you bottom-water your soil blocks to reduce the risk of the cubes crumbling. Our leakproof Lightweight Deep Trays are a good for use when bottom-watering.
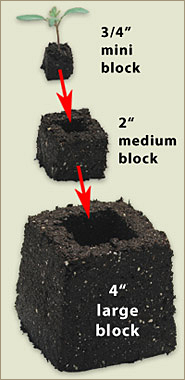
With a soil-blocking system, the process of potting on involves starting seeds in small blocks, then transplanting the growing seedlings into successively bigger blocks.
Potting Up (a.k.a. Bumping Up) with Soil Blocks
When you see roots growing out of the bottoms of your soil blocks, it’s either time to transplant them into the garden or to bump them up to the next size soil block.
- Bump up mini ¾” cubes into 2” diameter cubes.
- Bump up 2” diameter cubes into 4” diameter cubes.
Learn More
- How to Make Soil Blocks + The Advantages of Soil Blocking With Niki Jabbour • Video
- How to Use the Johnny's 72-Cell Soil Blocker • Video
- Johnny's 12-Cell Handheld Soil Blocker • Video
- Johnny's Hand-held 10 Soil Blocker • Instructions • Tech Sheet (PDF)
- Johnny's Hand-held 12 Soil Blocker • Instructions • Tech Sheet (PDF)
- Soil-Block Makers • Instructions • Tech Sheet (PDF)
- Johnny's 50-Cell Commercial Soil Blocker • Instructions • Tech Sheet (PDF)
- Johnny's 72-Cell Commercial Soil Blocker • Instructions • Tech Sheet (PDF)